In my previous post on the topic of Backup and Restore I mostly focused on Windows use cases and only briefly touched upon backing up Linux and MacOS systems. This is because Windows users have access to the amazing file system snapshotting capabilities in the form of Volume Shadow Copy “by default”. As for MacOS – it comes bundled with its own backup management suite called Time Machine, so backups are possible out of the box in there as well.
As for Linux folk... It’s a bit more involved, but still perfectly possible to backup systems without any downtime. And to do this one would need to make sure their system is running off an LVM system partition.
Why LVM?
If you have no idea what LVM stands for (spoiler: it’s “Logical Volume Management”), I would suggest you first get up to speed with what LVM is and why one would want to use an LVM partition for system storage rather than a standard EXT4/XFS one.
Either way, if you want to have an ability to backup a live Linux system (like an "always on" server or a hypervisor), you need to make sure the OS is installed onto an LVM-enabled volume, which supports creation of Snapshots. In this example we’ll set up an installation for a system with an EFI System Partition for boot-loader management. If you’re planning to go with a legacy BIOS boot instead, just skip the EFI partition creation step. The process is very straightforward and only takes minutes to complete.
Linux Mint is my long-standing favorite among all distros, so I will be using it to guide you through the process. But the steps described here should be more or less identical for the majority of Linux distributions, especially Ubuntu Linux derivatives, which Mint certainly is. I will also assume you have basic understanding of Linux, storage systems and disk partitioning, otherwise you should certainly not follow the guide and get some more experience first.
Why Not Use The Default LVM Installer Option?
Linux Mint installer provides an Advanced option of installing the OS onto an automatically set-up LVM volume. This is quite convenient. Except… It doesn't give the user any ways to customize the configuration of the volume group.

The main difference between Microsoft Volume Shadow Copy and LVM when it comes to creating snapshots is that VSC can utilize free space on any NTFS volume to store changing data when creating a "state in time snapshot", whereas in case of LVM the volume group needs to have some unused space available. This makes LVM quite a bit less flexible compared to VSC, so it's the users' job to make sure they leave some space available in the volume group, while making an "educated guess" on how much of the free space to actually reserve for the snapshotting tasks.
Sure, one can always try and resize the created logical partitions afterwards to make up more space for the snapshots and the swap area by taking it away from the root/home partitions. For that you would use the "--resizefs" parameter, which resizes underlying filesystem together with the logical volume, regardless of whether you are extending or shrinking the partition. However, not only would you need to perform this procedure externally, from another OS or by loading up a LiveCD, since you can't resize a system partition from the OS itself, another issue is that reducing existing partitions always comes with a fair bit of risk of data loss.
Therefore, when using the Linux Mint installer's default LVM configuration option:
- You can't specify the size of the default swap partition
- You can't tell the installer how much space you would like to reserve for snapshots
- You can't set the name for the created logical volume group (it's always "vgmint")
- You can't force the installer not to erase the whole disk in case you already have another OS installed, since this is simply not an option at all. If you want to have two OS'es present on a single physical disk, you must choose the "manual" route
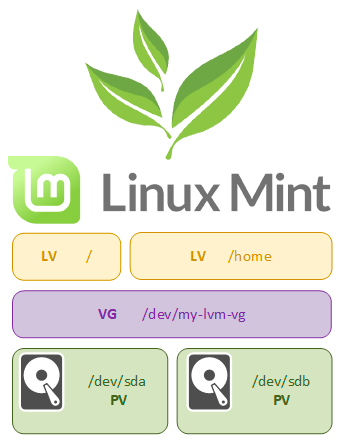
So after the "default" LVM installation you end up with something like this:

The installer only left poultry 48 MB of free space in the volume group! This will most certainly cause serious issues when the time comes to create snapshots of the whole system during the backup process.
Clearly, default LVM install is not the best way to go. So I personally don't recommend using this option and instead urge you to go with the manual way of setting up your LVM groups since it takes mere minutes. But it provides so much more control. I promise this process is simple. Trivial even!
Don't believe me? Check this out:
Prepare The Drive
Download Linux Mint ISO and burn it to a DVD or flash onto a USB drive. I recommend the 64-bit MATE desktop version as both very stable and feature-rich. Start the GParted app from the Apps menu.
Specify GPT as the partition table for the drive if it's brand new. If you already have another OS installed onto a GPT-partitioned drive, skip this step.


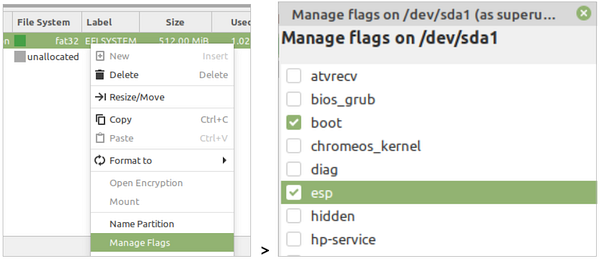
- Create a 512M FAT32 EFI partition if it's not present already (it will be present if there's another OS installed on the disk). Name it "EFI System Partition" and label it "EFI System"

- Apply the changes to the EFI partition.

- Set esp and boot flags for the EFI partition (right click, “Manage Flags”). Again – only if you had to previously create a new EFI System Partition in the previous step.
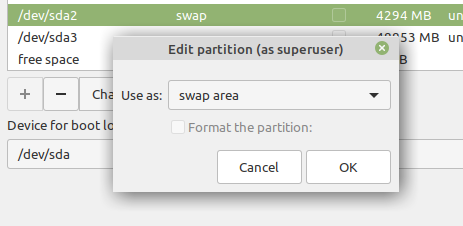
- Linux time! Create a linux-swap partition. 4G is a good bet if you don’t know how large of a swap you might need.

- Create an EXT4 partition using the available free space on the drive. Note: the majority of file systems don't allow to reduce the size of existing partitions, and only support their extension. EXT4 is one of rare and fortunate exceptions, that's why it's most commonly used in conjunction with LVM.
- If you wish, you can also create a /boot partition before creating the LVM partition. If you do, make sure to make it at least 1G in size. You can then decide to turn it into a logical LVM partition or leave as a simple EXT4 partition. Then during installation specify it as a /boot partition in installation options. Nowadays it’s not really necessary to use a separate partition for /boot unless you’re planning to install a really old version of Linux. In that case /boot might need to reside on a standard partition to orchestrate the boot process. See more info here.
- You can also opt to create a separate /home partition to store your users’ data in. In that case you probably already know what you are doing anyway, so this guide won’t teach you anything new.
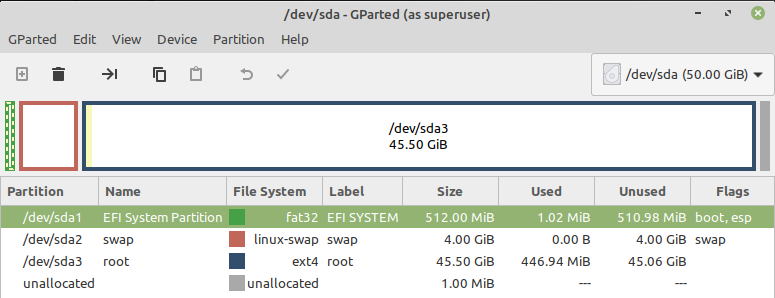
This is what you will end up with after all of the steps are done:
Set Up LVM:
Start the commandline Terminal and switch to the root user with:
sudo suCreate a physical volume group in place of the previously created EXT4 partition, which in my case ended up being /dev/sda3:
pvcreate /dev/sda3Create a logical volume group with the name of your choice. For example, “efilvm”:
vgcreate efilvm /dev/sda3Create a logical partition of the size = “/dev/sda3 size – x GB”. Important: DON’T USE 100% of the available volume group space, because free space within the group is required for creating snapshots! How much space to keep unused is up to you. I recommend at least 5G for an average system without huge databases of other Software that writes a lot of data to the disk all the time. More details here. For example, if your /dev/sda3 is 45G in total, then use:
lvcreate -n root -L 40G efilvmVerify that you still have some free space available in the volume group:
vgs
When done, you should see something like this:

Install Linux Mint
Start the installer and on the “Installation type” screen go with “Something else”.

Next, select the /dev/mapper/efilvm-root logical partition we created earlier, click the “Change” button and set is up as an EXT4 volume for root “/”.

Afterwards make sure other partitions are correctly configured as well:

Install the OS.
You're All Done!
After the installation is complete, load into the OS and verify the results in the “Drives” system app.
Here are our physical partitions:

And here's our LVM group with a single logical volume /dev/efilvm/root:

Now What?
Now set up your backups!
I won’t elaborate on all possible ways one would backup their Linux systems, because I opted for a simple yet effective approach of using FSArchiver with the help of a handy shell script. Simply create a backup.sh file, navigate to the directory with it in the terminal and execute as root. Like this:
sudo ./backup.sh
Reposting the contents of the backup.sh file here with slight changes just in case.
#!/bin/bash
VOLGROP='efilvm'             # name of the volume group
ORIGVOL='root'               # name of the logical volume to backup
SNAPVOL='tempsnap'           # name of the snapshot to create
SNAPSIZ='5G'                 # space to allocate for the snapshot in the volume group
FSAOPTS='-Z15 -j4'           # options to pass to fsarchiver
BACKDIR='/mnt/hdd/backups'   # where to put the backup
BACKNAM='root-fsa-backup'    # name of the archive

# ----------------------------------------------------------------------------------------------

PATH="${PATH}:/usr/sbin:/sbin:/usr/bin:/bin"
TIMESTAMP="$(date +%Y%m%d-%Hh%M)"

# only run as root
if [ "$(id -u)" != '0' ]
then
        echo "this script has to be run as root"
        exit 1
fi

# check that the snapshot does not already exist
if [ -e "/dev/${VOLGROP}/${SNAPVOL}" ]
then
        echo "the lvm snapshot already exists, please confirm removal:"
        lvremove "/dev/${VOLGROP}/${SNAPVOL}"
        exit 1
fi

# create the lvm snapshot
if ! lvcreate -L${SNAPSIZ} -s -n ${SNAPVOL} /dev/${VOLGROP}/${ORIGVOL} >/dev/null 2>&1
then
        echo "creation of the lvm snapshot failed"
        exit 1
fi

# main command of the script that does the real stuff
if fsarchiver savefs ${FSAOPTS} ${BACKDIR}/${BACKNAM}-${TIMESTAMP}.fsa /dev/${VOLGROP}/${SNAPVOL}
then
        md5sum ${BACKDIR}/${BACKNAM}-${TIMESTAMP}.fsa > ${BACKDIR}/${BACKNAM}-${TIMESTAMP}.md5
        RES=0
else
        echo "fsarchiver failed"
        RES=1

##      exit (1);  # don't remove the snapshot just yet
                   # perhaps we will want to try again ?

fi

if [ "$RES" != '1' ]  # prevent removal if error occurred above.
then

  # remove the snapshot
  if ! lvremove -f /dev/${VOLGROP}/${SNAPVOL} >/dev/null 2>&1
  then
        echo "cannot remove the lvm snapshot"
        RES=1
  fi

fi

exit ${RES}
For me this is a good enough solution, but you might want to look into something with native scheduling capabilities and maybe a graphical interface. There are loads of articles on the topic, you may want to start with this one.
With all that, I congratulate you on a good job securing your data and wish you luck to never end up needing the backups you create!