This post is not a comprehensive dive into the world of microcontrollers, but rather a brief introduction and a compilation of interesting facts I've collected over the months working on a couple projects that made use of contemporary microcontrollers to achieve real and practical goals.
The Harsh Reality of Reality
I'm sure you're well aware of the situation with microelectronics prices. It's been getting worse for a couple years and doesn't look like it will improve any time soon due to the on-going crisis in several areas at once: semi-conductor component shortages, logistics issues, political games, socioeconomic factors and everything in between. For an average technically-minded person this means that one must look for creative ways to achieve their goals or alter those altogether.
We do live in the real world after all, and one must adapt or perish.
Remember "low-cost single-board PCs" we eagerly watched evolve and get cheaper over the years? All of those Raspberry/Orange/Rock Pi's and "Zeros", Tinker boards and Jetson Nanos? Oh they did evolve all right… Into overpriced 100+ USD boards. So now we're stuck in a reality where even the simplest single-board ARM PC in the form of a Pi Zero W is valued at 100 USD, instead of the "recommended" retail price of $15-20.
So… What Do?
There are practical alternatives to single-board PCs:
- Small x86/x64 PCs
- Microcontrollers
The first option is blatantly obvious if you're looking for a device with a real multitasking OS and a load of compute power. And used PCs nowadays? They are cheap. For a market price of about $150 for a Raspberry Pi 4 with 4GB RAM you can get a used mini-PC with a 4-core Pentium/Celeron CPU, 4 to 8 gigs of extendable RAM and a 128GB+ SSD system drive with an option of connecting a second drive via SATA or M.2.
Almost any PC will blow a Pi out of the water performance-wise. Sure, small PCs can't beat Pi boards' dimensions, power consumption and embedded IO-capabilities with over 20 I/O pins exposed for communicating with external devices. So if you're looking to set up a home web/file server, retro emulation station or use the machine as a simple desktop PC, opting for a used mini-PC today would be a no-brainer.
But what if you actually require rich I/O capabilities, small dimensions and low power-drain of a small single-board device?
Perfect Chips for Practical Goals
In contrast to full-fledged general-purpose systems like ARM SoCs or PCs, microcontrollers are much more limited in their computing power, but unrivaled for certain tasks due to their tiny size/power requirements, as well as rock-solid stability and reliability thanks to not having to run highly complex operating systems, instead opting either for a single threaded code execution approach or a real-time OS with a basic task scheduler.
There are many different MCs available on the market, but the most well-known are Arduino boards, ESPs by Espressif Systems, Nordic MCs, STM32xxx series, and recently — Raspberry Pi Pico chips.
But what's especially cool is that some of these also support wireless features like WiFi and Bluetooth!
As you can imagine this drastically changes the dynamic of using a controller: it's no longer a chip you have to connect stuff to physically. Oh no. You can have it available on the wireless network and make it respond to commands via HTTP, do network requests, turn one into a Wi-Fi hotspot or connect to it using Bluetooth.
Now THAT's future!
For example, ESP32 microcontroller by Espressif Systems is used to provide WiFi and BT functionality in a recently released PlayDate mini-console.
Here the ESP32 SoC (outlined in purple) is clocked at 80 MHz (the lowest frequency at which the wireless functions are available) and communicates via UART with the central processing unit in the form of ARM-based STM32F746 clocked at 180 MHz.
What a neat little thing and a cool application of existing off-the-shelf tech!
MCs from different brands have their pros and cons, but what makes some of these particularly interesting and useful for a hobbyist is the fact that several of manufacturers or their partners make and sell so called "Development boards".
Instead of a traditional approach where you need to purchase a controller and a USB to TTL UART flashing board separately, then figure out how to flash your particular chip/flasher combo, you can buy something ready-made. And it looks like this:
Not only does it make trivial to power the board (just connect it via micro-USB or USB C), most of these boards are breadboard-compatible and come with industry-standard (or even native!) USB UART interfaces, allowing for easy code upload via USB, which makes them ideal for rapid prototyping.

Huge Success!
As much as it may look like a glowing advertisement for the ESP product line from Espressif Systems, I simply have to commend the brand for producing affordable and extremely capable multi-purpose chips. Be it the older, tried and true but discontinued WiFi-only ESP8266 line-up or the current ESP32 branch that supports WiFi and Bluetooth, ESP boards are among the most popular MCs out there. They also became my gateway into the world of microcontrollers. Specifically, it was the ESP32 S2 variant in the form of a WEMOS LOLIN S2 Mini V1.0.0 board.
Wanna know how it happened?
Easy: I turned one into an auto-jailbreak device for my PS4 Pro!
It's true what they say: you never know where and when you'll discover something new. One faithful day through serendipity I found a guide on how to automate otherwise cumbersome PS4 v9.00 firmware jailbreak using a curious little chip called "ESP32 S2". I simply had to try and replicate the results. So I picked a suitable ESP32 S2 board with enough on-board PSRAM and a USB C port (since ESP32 S2 can natively act as a virtual USB device) and flashed it with the provided firmware…
And It Worked!
Here's what this little controller board does to make jailbreaking the console a breeze:
- ESP32 connects to the local network via WiFi and hosts a website with an exploit
- When you point PS4 to this site, its web browser executes the exploit and at some point expects a USB storage device to be connected
- Here's where ESP32 S2's USB emulation support kicks in: at this stage the controller identifies itself as a freshly connected USB drive with a file system that appears to be damaged in a very particular way
- PS4 swallows the bait and voia! — You have full access to the kernel and can run homebrew apps like Retroarch or even another OS like Linux

Having done this and now aware that today's microcontrollers are more than just "chips with pins" and support wireless operation over WiFi and Bluetooth, I decided to try and see whether I could program one with my own code.
For curiosity's sake I decided to program both the contemporary ESP32 board and a now obsolete ESP8266 chip. However, regardless of its age (released in 2014) a much simpler ESP8266 made a perfect stepping stone for me as a beginner.
The Very First Microcode
You can imagine my delight when I successfully made the on-board LED blink.
After that I was able to get going coding my own behaviors in no time using small pre-made modules: LEDs, a temperature/humidity sensor, buttons and a photoresistor.
Soon more exciting experiments followed, particularly in the visual department. Here both ESP8266 and a more capable ESP32 can be seen having some sweet geek party action:
And then…
At this point I finally realized that to continue I needed to forfeit those pre-made modules and actually design a schematic of my own with off-the-shelf electronic components…
Oh...
Oh, right… Electronics.
A Perfect Introduction to Electronics…
What someone can initially easily overlook after discovering the world of microcontrollers is that when one says "microcontroller" it's usually a short-hand for: "a circuit-board with electronic components and external hardware managed by a microcontroller".
So unless you're only looking to blink an on-board LED, chances are you will need to design even the simplest schematic for several interconnected components to achieve practical goals in the real world: read sensor values, send control commands to external peripherals (maybe even over WiFi or Bluetooth) or display useful data on an LCD/OLED display.
What does a typical circuit-board look like? — A bunch of capacitors, resistors, switches, sensors, maybe even inductors and fuses, interconnected by jumper cables or copper traces. And they all have to work together or directly communicate with the microcontroller (or several) for the resulting device to carry out the required functions.
Although it's not strictly necessary, I highly recommend to brush up on that electronics knowledge before trying to build something using a microcontroller, to avoid ending up with a pile of dead components. A good place to start without having to pay a penny would be the Physical Computing course by the University of Washington.

It's exceptionally well-structured and even if you're a complete noob (I know I was 6 months ago when I started playing with MCs) you will find the explanations very easy to understand and follow.
…And a Great Learning Tool for Kids
I strongly believe that microcontroller programming and simple circuit design is an amazing combo to use to teach your kids about electronics and coding. If your child likes gadgets and is curious about the nature of how they work, you will do one a great service by introducing him or her to the world of microcontroller dev-kits.
Consider this:
It's Safe
We're talking 3-5-volt circuits and easy to use jumper cables. It's also difficult to fry the components on the board due to low overall circuit current
It's Easy
You can get a programming environment up and running in no time by simply installing Arduino IDE or opting for any Micro/Circuit Python tools. Any option comes with a plethora or code examples which you can either flash and use directly or modify to your heart's content
It's a Cheap Hobby!
A typical ESP32 board will take you back 5-15 USD. And the Dev Software is available completely free of charge. If it some point you decide to extend the capabilities of the device by using external peripherals, you'll also discover that breadboards, jumper cables, small LCD screens, LEDs, resistors and the like are extremely affordable and easily available online either separately or as "starter kits". For example, this "Arduino starter kit" costs ~30 bucks, comes with all kinds of goodies and even includes a motor. It would make an excellent pack to complement an ESP32 Devkit board, which is much more capable than the bundled Arduino Uno. And this kit will be good for months of experimentation.

So if you wish to help your child or age 7 or older develop operational mindset, forget about those wildly overpriced Lego robotic sets! This way you'll save loads of money and help your kid understand the real, physical world better in some of the most fun way possible, as well as introduce the child to critical thinking skills, — something everyone needs in life.

So How Do You Program These?
Gone are the days when you'd have to be a rocket scientist to write and flash your own code to a microcontroller. Nowadays there are numerous easily-accessible ways to develop software for these chips, and several brands actually provide not only the toolchain to compile the code, but offer their own IDEs.
For example, Espressif provides their ESP-IDF (Espressif IoT Development Framework) as an Eclipse plugin and a VSCode extension, while Nordic offers just the SDK that you need to integrate into your own software development pipe-line.
But Arduino, one of the founders of the "consumer"-oriented type of a microcontroller, maintains one of the better known and popular Development Environments out there — Arduino IDE.
And, contrary to my initial expectations, their IDE was not strictly limited to only working with Arduino boards!
Thanks to its open-source nature and ease of extendibility, the same IDE can be used to program a wide range of third-party MCs, including those from Espressif! Even cooler than that is the fact that several years ago, when Espressif were mostly interested in large B2B deals and corporate clients, the ESP8266 tool-set for Arduino IDE was not offered by the company at all. So it was painstakingly developed by the open-source community, who fell absolutely in love with the 2014-released WiFi-capable microcontroller. What followed suit was an explosive growth of popularity of the ESP8266 chips among hobbyists and smaller companies, as well as the realization by the Espressif software engineers that maybe Arduino IDE was not a toy and they might want to offer an official library for the IDE for their upcoming ESP32 series of chips.
And that's exactly what happened — ESP32 board library (also known as "Arduino core for ESP32") is maintained my Espressif with the help of the community. Thanks to this, IDE users can program the latest goodies like the recent ESP32-S3 series of chips straight from the developers almost as soon as new chips hit the market!
Arduino IDE is available as V1 and V2. Even though V2 is considered unfinished, I've been exclusively using it to develop for my ESP boards and had little to no issues, so I would highly recommend going with the V2 branch. Especially considering that IDE now supports suggestions and can do useful code analysis.
To sum up, here are my main "selling points" for Arduino 2.0:
- Works and functions very similarly to VSCode, which is a well-known excellent IDE on its own
- Runs very well under Linux, for which it's available in the form of an .AppImage executable. In fact, I've been coding in Arduino IDE from a Linux OS running inside VirtualBox, with MCs passed to the guest system via USB pass-through, with zero issues
- There are libraries for almost any common hardware and tasks: sensors, screens, HTTP/MQTT servers and clients, and outstanding helper libraries like ArduinoJSON and SafeString
C++ and Arduino are made for each other. Coding with C++ in Arduino IDE was true pleasure
In fact…
A Definitive C++ Coding Experience
To tell the truth, one of the key reasons I never seriously considered even trying to program an embedded system like a microcontroller was the fact that they were supposed to be programmed in C or C++ due to performance and memory limitations.
I didn't really have extensive experience coding in such "serious" or "old-school" languages before.
Sure, tens of projects and thousands of lines of code in PHP, JavaScript, and later — in Unity — C# allowed me to get a firm grip of programming concepts and techniques. But the dynamically typed nature of PHP and JS, as well as rich garbage collection capabilities of C# made it seem like those were so much ahead of C++ that it sort of made the latter "obsolete" in my mind.
Thankfully, I was wrong!
The subset of C++ used in Arduino IDE is extremely close to the aforementioned C# feature-wise. It's strictly typed, supports fully automatic memory management, structs, classes, anonymous functions and a lot of other goodies that I thought were only available in more "contemporary" languages.
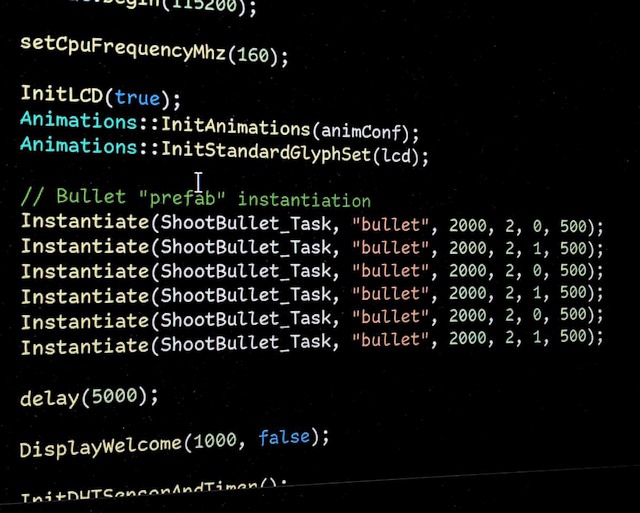
I mean, tell me, does this look scary to you?
It's… It's just code! Normal "C-like" code where one creates objects, calls functions and writes debug messages into the Serial console! Arduino even comes with its own custom classes like "String" that greatly simplifies working with character strings.
Trust me, C++ is not as scary as people meme it out to be, — C is! You wouldn't want to code in C. That's why object-oriented C++ was created in the first place and it can get the job done without driving you insane.
Python and Co
I am aware that there are interesting developments when it comes to interpreted languages and microcontrollers. MicroPython and CircuitPython for example.

I haven't actually used either of those but have some thoughts. You see, these are interpreted languages, so they are easy to code in, support garbage collection and can either be dynamically or strongly typed. But the reality is: they have much less support when it comes to third-party libraries and are noticeably slower compared to compiled languages.
The difference in performance is exaggerated in the following comic, but remember that we're dealing with microcontrollers here. Devices with mere kilobytes of RAM and teeny-tiny CPUs.
Also, microcontroller programming isn't as popular as software development for "traditional" OS'es like Windows, Linux or MacOS. Most people who end up doing anything of significance using microcontrollers in most cases do so with the help of either C or C++ because of the hardware limitations of these small devices have, as well as availability of decades-worth of ready to use libraries and official SDKs for interfacing with MCs and the external hardware.
This situation sort of reminds me of how game development was done in Unity game engine before 2017: the engine supported programming in three (!) languages: UnityScript, BOO and C#. The former two were supposed to be easier (and actually were) due to less boilerplate code needed for basic behavior programming, but were very limited when it came to third-party support and powerful language capabilities like function and operator overloading found in C#.
When I started out prototyping my first game, UnityScript was the first choice, especially since the main demo project that Unity shipped with back in the day was AngryBots written almost entirely in UnityScript. Or "JavaScript" as it was often called due to similarities between the two, hence the ".js" extension for the script files.
It only took me a month or two of coding before I decided to jump ship to C# due to serious limitations of UnityScript. There were tools for migrating from JS to C# and they were always popular even before Unity dropped UnityScript support. Because most devs would quickly realize that no matter how "welcoming", UnityScript was hindering their progress with writing efficient and maintainable code.
Indie devs weren't the only ones to realize that Unity's take on its own homebrew language was not the way to go, so Unity team finally bid farewell to UnityScript and Boo starting Unity 2017.2 beta 2.
So when it comes to MCs, python alternatives are still alive and kicking, yet I'm not sure how useful they really are for even moderately complex tasks are as they come with higher requirements to RAM as well as noticeable performance difference compared to code compiled to native CPU instructions with C, C++ let alone assembler.
It's up to you to decide which language to go with, but if you have coding experience with any C-like language, trust me, you'll be writing C++ code in Arduino IDE in no time.
There are many tutorials on how to code for MCs, particularly ESP32s, and this video by DroneBot Workshop should be a good start:
Practical Smart Devices
Long story short, I ended up building two devices using ESP32:
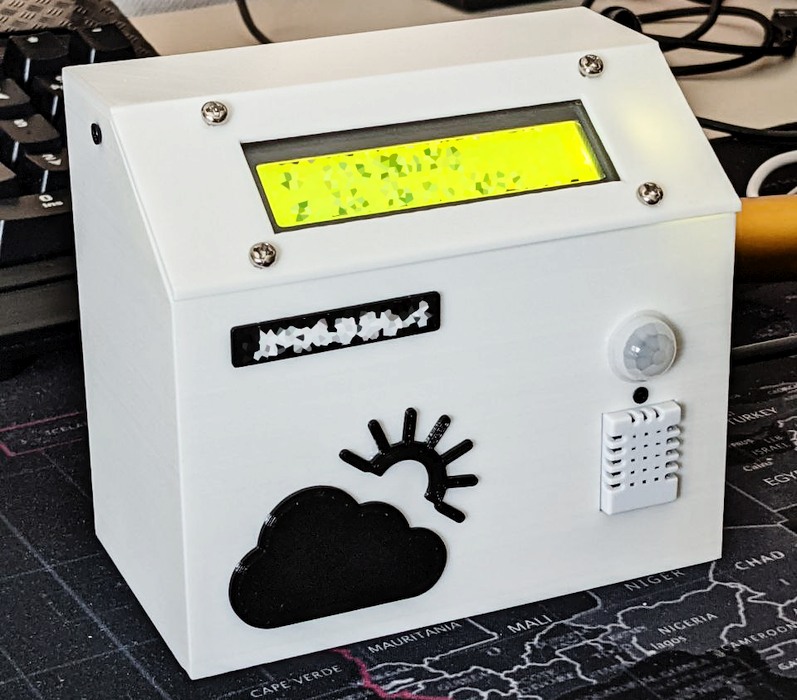
- Weather Station — device to collect, store and display data on temperature, humidity and atmospheric pressure from several sensors, with a motion sensor used to smoothly switch the LCD backlight on
- Smart Bathroom Fan — a system that uses data from a humidity sensor to automatically control a 12V/3A 4-pin air vent fan using a PWM control signal
Here the top two boards are the same device (Weather Station) built using two different ESP32 boards and circuit designs, and on the bottom-left is the smart 4-pin PWM fan controller for the bathroom fan, powered externally by a 12V to 5V converter board.
Web UI for a Makeshift Smart Device
Along the journey I got a chance to put my web dev skills to good use and developed web apps for both devices, hosted on themselves via ESPAsyncWebServer. Both make heavy use of JavaScript and async fetch calls to their local JSON APIs.
The Weather Station UI allows to display history for the last 2 hours of readings and gives access to a weather forecast and a complete accumulated history of readings that are stored on the device's SD card.
The Bath Fan app is much simpler and just mimics the physical display using a JS LCD emulator, allows changing preset values and the mode of operation of the device.
Since I also wanted to be able to manage files on the SD card remotely from the browser I developed a simple file manager, and it ended up being an extremely useful tool that saved me a lot of time during testing and development.

As a final accord, I implemented a way updating the firmware over WiFi. Just like in commercial hardware! And of course, all management tools are protected by a password.
As you can see, an amateur project can indeed be made to look and function very much like a commercial device thanks to the power of the contemporary off-the-shelf microcontrollers.
All you need to do is to come up with an idea and implement it via code. Anything is possible!
Bonus: 3D Printing
A Smart Device needs a good home and not just a breadboard with a bunch of flimsy jumper cables. For the Weather Station I took dimensions of all components and the PCB board, then prototyped a 2-part case in my 3D editing app.
Along the way I kept re-printing and updating the model and after several iterations ended up with the final case design. It's not the prettiest thing ever, but it's spacious enough to house all components I soldered and socketed onto a PSB board. I decided against soldering the main modular components to the board to make the device easily serviceable, in case any of them fail in the future. Much easier to just slot a new module into a socket instead of having to de-solder it from the board. All of the jumper cables were then fixed in place with acrylic.
So in the end this mess:
Was transformed into this:
The case should be sturdy enough to survive many years of use. It is a present after all!
Here's the final Smart Device:
Cool Facts and Links
Finally, some interesting stuff that I discovered on my journey.
ESP32 Multitasking With FreeRTOS
ESP32 comes with a real-time OS called FreeRTOS. It's not a full-featured OS of course, but it does have a task manager. This makes it possible to create so called "tasks" with various priority levels to run in parallel, and simplifies writing complex programs where the controller needs to perform several tasks in a non-blocking mode, something that is extremely difficult to do on a device that only supports executing code as one giant "super-loop".
To find out more about FreeRTOS, check out this excellent series of videos by Digi-Key.
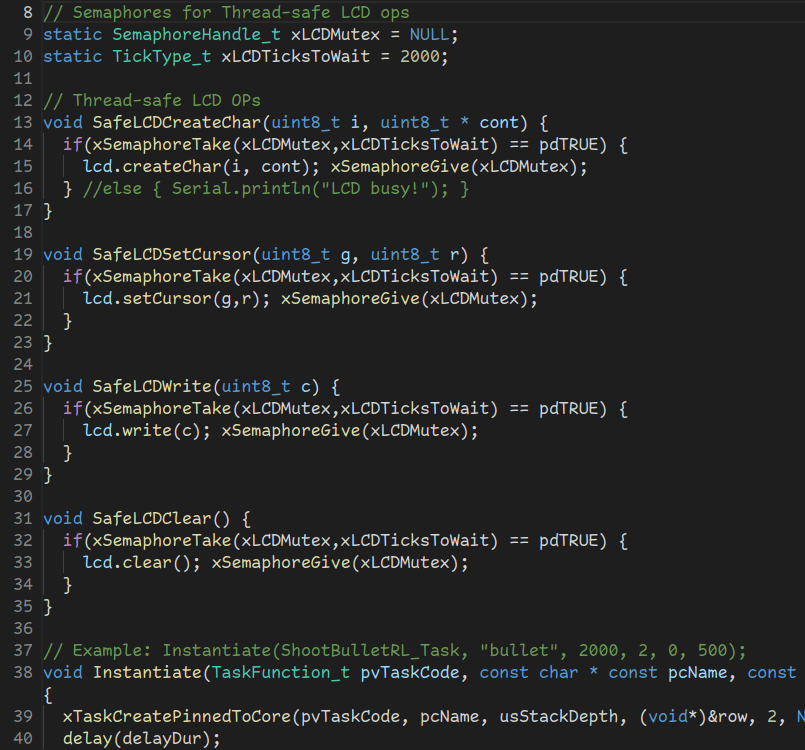
To test the power of tasks, I implemented a Unity-like "Instantiate" method in my code that uses thread-safe LCD calls to draw several animations at once. Thread-safety is achieved with the use of mutexes and allows to do something that would pretty much be impossible on a device with a single super loop: non-conflicting interfacing of several tasks with external hardware.
In this example I'm using a simple 1602 LCD screen with an IIC backpack.
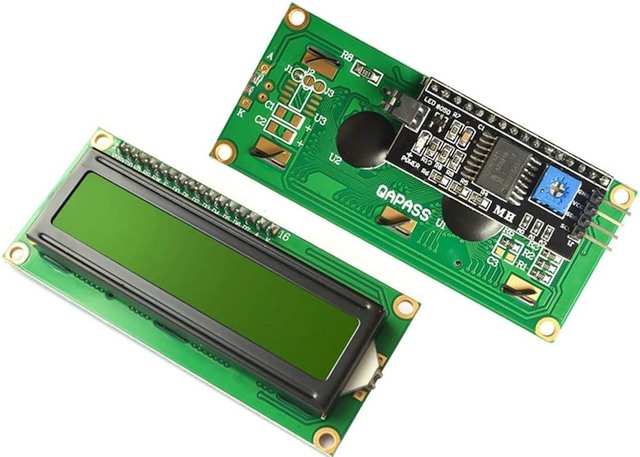
IIC commands must be sent strictly in accordance with the IIC protocol. You can imagine how devastating it would be to try and mix LCD control signals from two or more different tasks — this would simply crash the screen (and the controller) since instead of a correctly ordered set of commands IIC would be receiving a bunch of random bytes.
To avoid this I used a binary semaphore to make sure only one task interfaces with the LCD at any moment. And as soon as it's done drawing to the screen, it releases the semaphore and the next task in queue draws its glyphs. And so on. This sounds complicated, but thanks to FreeRTOS is very easy to implement and use.
And here's the result: non-conflicting tasks drawing several animated sequences to a single LCD screen.
With thread-safe operations and FreeRTOS multitasking support, one could easily make a game for an ESP32+1602 LCD combo with this simple technique!
Great for Battery-Powered Projects
Thanks to its low power requirements and support of a "deep sleep" where it consumes micro-amperes of power and can be woken up by an interrupt from an external device or on a timer, ESP32 makes for a great controller for battery-powered projects.
To find out more, check out this video by Andreas Spiess.
So Many Development Boards!
ESP32 is available in a plethora of shapes and sizes, but most importantly — with different on-board interfaces as well. For example, here's an ESP32-CAM board that comes with an SD card reader and an interface for connecting a camera. It can be used to create a wireless camera that can stream a video over WiFi or store recordings on an SD card.
One of these proved vital for my 3D printing needs: thanks to ESP32-CAM with a fish-eye camera module I can monitor my printer remotely from anywhere in the world by connecting to my home network and visiting ESP32-CAM's web server using a browser!
Or how about a board with an embedded screen and support for an external WiFi antenna?
There's even a board with an RJ45 LAN connector for projects that require the most reliable network connection!
There are devkit boards for any task and most of them are very reasonably priced.
Transistors and Mosfets Are Your Friends
I know, I know… Strictly speaking mosfet is a transistor, but it's easier to say a "mosfet" instead of a "metal–oxide–semiconductor field-effect transistor". Either way, depending on your design, at some point you might need to switch a section of your circuit on or off without the need to use any mechanical switches.
You can either do this with a traditional current-activated transistor or a mosfet. In many cases it's much easier to go with a mosfet since it can be switched on or off with voltage over a certain threshold with a generous leeway range-wise. There are several mosfets on the market suitable for logic-level voltages found in circuits — 3.3V or 5V.
For example, I started with an IRLB3034 mosfet because I wanted to smoothly control the screen's backlight LED brightness using a PWM signal and not just on/off commands available via an IIC-backpack.
It worked, sure, but this power transistor was comically large and powerful for such a trivial task. After some digging I found a suitable compact mosfet — AO3400…
Well, maybe a bit too compact…
This is an SOT-23 form-factor mosfet. Small, but very beefy. More than capable for my needs. So… How did I manage to make use of it?
I soldered it onto an "adapter" board!
Here on the left you can see the ribbon with the mosfets, on the right — SMD to DIP adapter plates and in the center — assembled boards with pull-down resistors neatly placed at the top. I made 4 because it's always nice to have versatile logic-level mosfets with such a small footprint readily available for future projects.
I would highly recommend anyone interested in electronics to learn the basics of using mosfets. As well as bi-polar transistors for cases when a circuit wouldn't be able to provide high enough voltage to open a mosfet, but would supply enough current to open a "traditional" bi-polar transistor.
Mosfets are awesome.
Not Just ESP32
ESP32 by Espressif isn't the only reasonably priced microcontroller with WiFi capabilities. As of Summer 2022, Raspberry Pi Pico W revision is available and it finally features WiFi connectivity. It's more or less comparable to ESP32 when it comes to price but is quite limited CPU- and memory-wise. But unlike ESP32 it has a much more open design with less proprietary tech on-board.
Summary
If you wish to automate something in the real world without going broke or build your own smart device, consider getting and programming a microcontroller instead of a single-board computer.
It's a unique and highly rewarding experience which will open your eyes at how capable and easy to use modern electronic chips really are, as well as help hone your coding and systemic thinking skills.