As I mentioned in my previous post, I had an idea for a practice sculpture project and needed to find some software to bring it to fruition.
If there is one thing I love doing, it's trying out different pieces of software. This time an app of my choice would need to be capable of providing a comfortable and intuitive sculpting workflow as well as being more or less affordable.
So let's check out the results of my quest to find the perfect sculpting app.
Avid Softimage|XSI
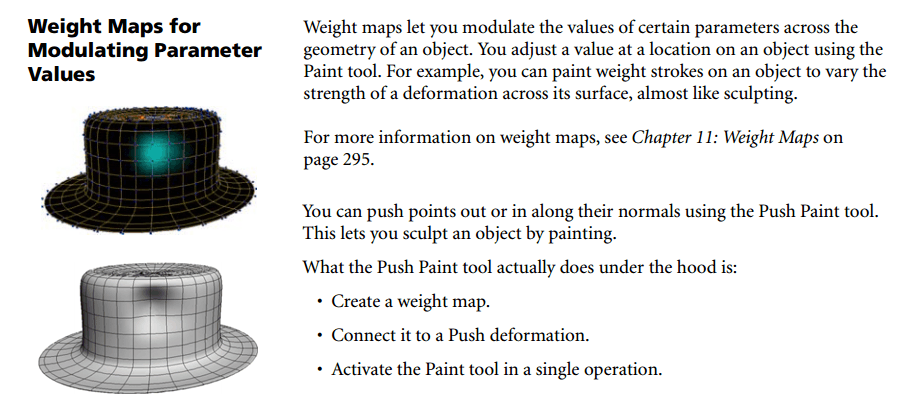
Being a Softimage|XSI zealot I simply have to say something about it. This paragraph will be short: XSI has no sculpting tools apart from the tweak tool in the proportional transform mode and a weightmap-modulated push, which the manual says "feels almost like sculpting".
Wow! How cool is that, huh?
Apart from that, XSI's UV-tool-set is almost a decade old, so... Nothing to see here.
Autodesk Maya
First of all, it's Maya.
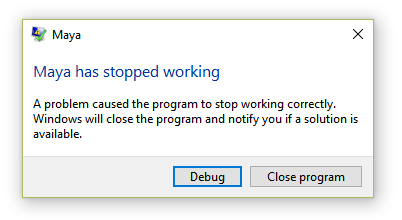 Maya, even the latest 2018 version, is a frustrating crash-fest
Second of all, a yearly subscription is a whopping ~$1500. And finally, it provides a very basic sculpting tool-set Autodesk is gradually pulling out of Mudbox (which is also not feature-rich in that regard, to be honest).
Thanks, but no thanks.
Pilgway 3D Coat
Naturally, 3D Coat was my first choice simply due to the fact that I already had a license and lots of experience UV-mapping and retopologizing meshes as well as having spent a while in the Paint Room while working on my first finished 3D environment scene.
 "The Office" created with Softimage, 3D Coat and rendered with Redshift
Well, guess what? Turns out, 3D Coat triangulates anything and everything that enters the Sculpting Room!
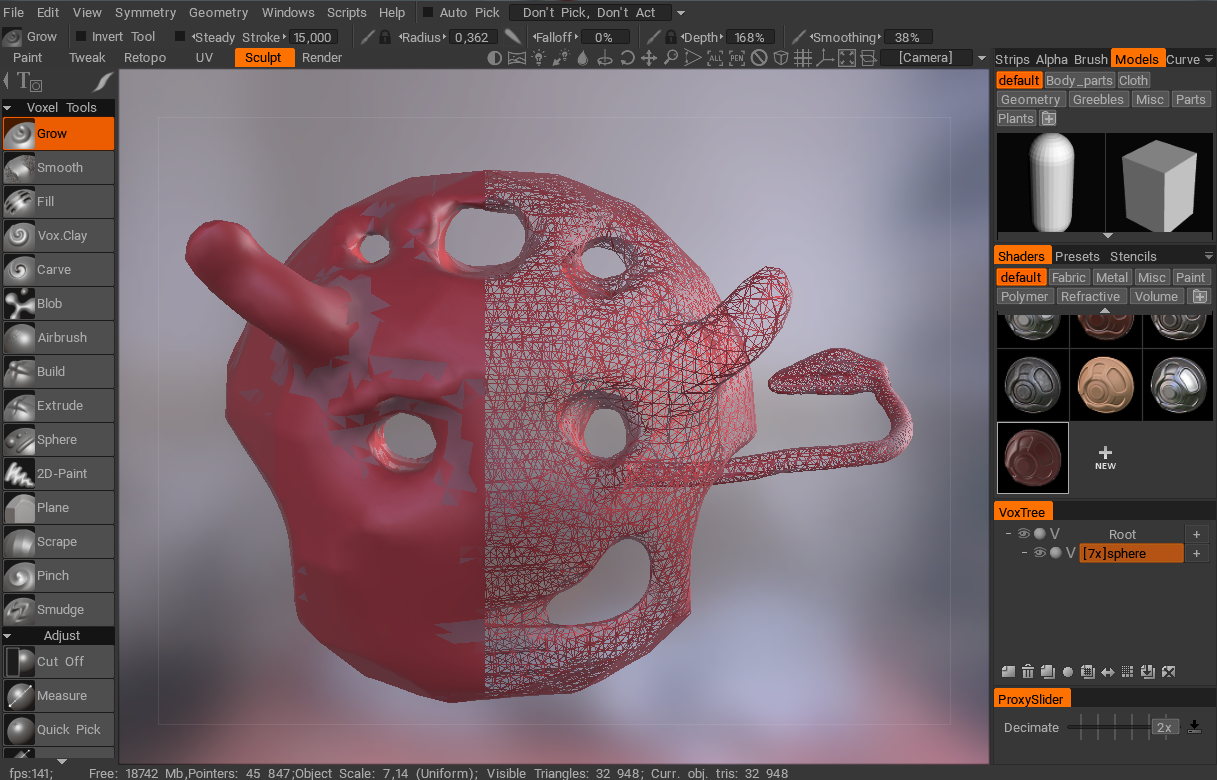
See this perfect, quad-only sphere?
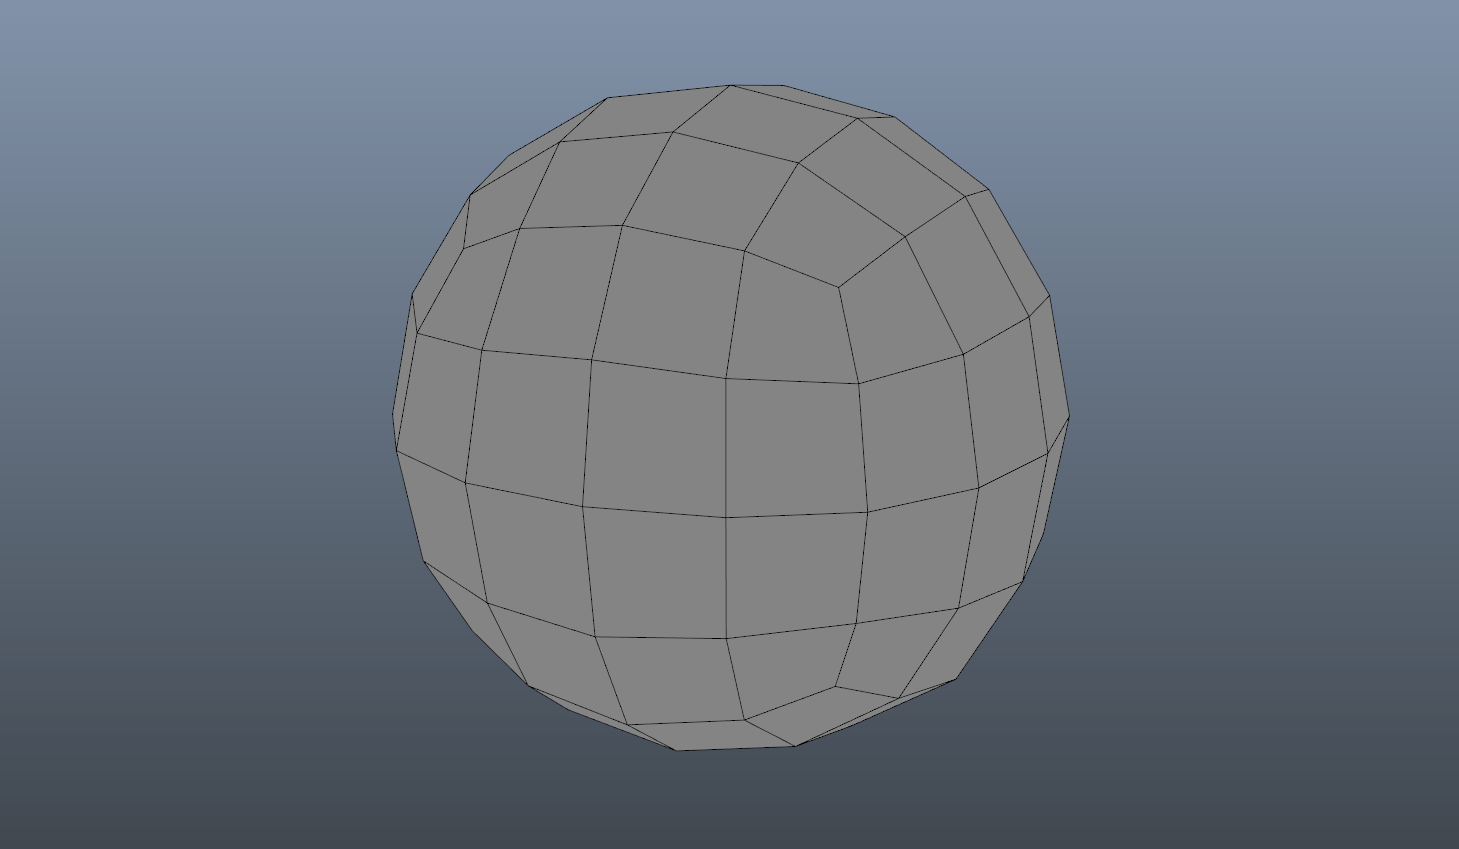 Look at these pretty quads!
This is what it looks like after you import it to 3D Coat 4.8 without voxelizaton (that is - keeping the imported object as a "surface" or a "poly" mesh):
 Look at these... Triangles!?
It's no surprise then that 3D Coat doesn't support the industry-standard multi-resolution sculpting workflow in a sense where you start with a low-poly basemesh, retopologize it if necessary and then subdivide it again and again, gradually adding detail while still being able to go back to the original basemesh to make drastic form changes. You can modify an unchanged quad-only model in the Tweak Room which has some of the tools from the Sculpt Room, but there's no way to subdivide the mesh and no multi-level subdiv tweaking option available.
 Multi-resolution sculpting
What 3DC offers is quite different: see that "ProxySlider" in the bottom-right corner of the 3D Coat window? Here's your multi-resolution sculpting if you want it. Just subdivide your (triangular!) mesh to a couple mil polys and whenever you need to make large-scale changes to a virtual low-poly version of it, just select the level of polygon reduction using the slider and click that "Decimate" button. Ready to sculpt? Oh no, you aren't. Because 3D Coat has to go through those millions of triangles and decimate to the target poly count which can take anywhere from a second to tens of seconds. Every. Time. What an exciting workflow, no?
So the only solution is to import the mesh directly into the sculpt room either from the retopo room or from a file. Doesn't matter if you just want to import the mesh "as is" (that is with quads) for tweaking it in the Sculpt Room. Instead it will be triangulated to a specified degree. I suppose this is due to the fact that historically 3D Coat Sculpt Room was mostly used for conceptional "voxel" sculpting. "Surface" (that is classic "poly") sculpting was added later and only with an option to work with triangulated meshes.
The idea was that when you were done sculpting you would at some point need to retopologize the model and before that you wouldn't care much about the topology. In theory. But what about tweaking the final retopologized version? Well... 3D Coat does have a tool attribute "Conform Retopo Mesh" which acts similarly to that of the cage operator in XSI, deforming the Retopo Mesh along with the Sculpt mesh. But, unfortunately, it's only available for three tools in the Sculpting tool-set, which are Pose adjust, Move tool and SRT transform and they all laggy due to the amount of work 3D Coat has to do to link points on both retopo and sculpt meshes. No idea if this approach is viable at all.
Hence you have two options. You can:
- Create a low- to mid-poly mesh in a 3D DCC app of your choice, import it to 3D Coat "as is" to UV-unwrap and paint textures and displacement details in the micro-vertex paint mode (to a certain degree) or...
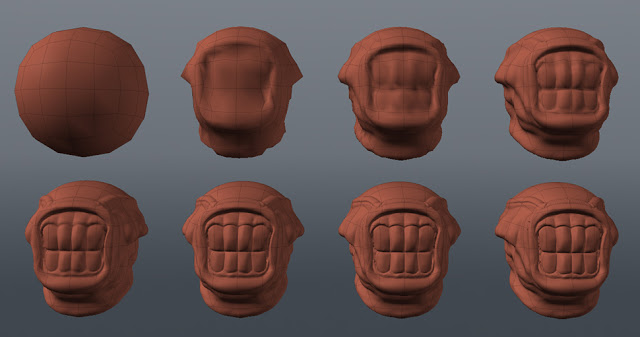
- Create a low-poly "base" mesh or generate a primitive within 3D Coat, sculpt the hell out of it (say, by turning a sphere into a human head with several mil polygons), then import it into the Retopo room, retopo it manually or automatically and then take it to the Paint room to finalize the asset.
When it comes to voxel sculpting in 3D Coat it is what it is... Well, voxel sculpting. With all of it's grand strengths and limitations: you can forget about polygons and do whatever you want with a piece of your digital clay: the volume will constantly get triangulated with a cube marching-like algorithm adapting to the voxels in the sculpting area, but the mesh will have constant polygon density across the surface.
 3D Coat voxel sculpting mode
The biggest issues for me are:
Some sculpting tools are only available in either of the working modes: "Surface" (working directly with polygon meshes) and "Voxel". Converting your sculpt between those is destructive and with each conversion you will inevitably lose detail and the surface of your model will go through triangulation hell with each iteration. Forget about fidelity. Or rack up mesh/voxel resolution to insane values and enjoy laggy sculpting performance as well as huge project file sizes. Your choice.
You can increase mesh resolution locally using so called "Live clay tools" which will tessellate the surface under your brush to adapt to the required detail level. Again, fun idea in theory, but it basically locks you out of being able to convert your mesh to voxel and back without losing all the hard work (since in the Voxel mode mesh resolution is uniform and is based on the resolution of the voxel grid). Also forget about trying to smooth out that surface, especially in the areas where mesh resolution is changing. Even though 3D Coat offers several smoothing modes:
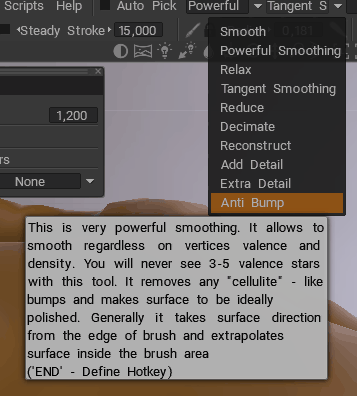
3D Coat smoothing modes...it's still a weak substitute to having a normal quad mesh instead of this triangular mess.
 Triangles are your worst enemy if you're going for a smooth surface
No thin geometry support. Nada. Zilch. Hence 3D Coat (as of v4.8) still does not offer a direct alternative to ZBrush "Extract" tool functionality! I searched high and low and found out that the only tools coming close to such functionality were Vox Extrude and Vox Layer, the latter producing meshes with thickness and rough edges.

If you trick 3DC which has no "thin plane" primitive, and import one from an external file, you will find out that all brushes produce unexpected results if you try sculpting on back faces of polygons. I consider this unacceptable.
All in all, for me sculpting in 3D Coat feels like hacking a tree stump with a rusty axe.
No offense, Andrew.
I also found 3D Coat 4.8.xx to be quite unstable when jumping between rooms and, to add insult to injury, 3DC doesn't support sculpting layers in Surface sculpting mode. It's been in the roadmap for a long time, but still hasn't been implemented.
Still though, as a painting/retopo/UV tool 3DC is brilliant and I will talk more about painting in 3D Coat in the upcoming blog posts in this series.
Blender Foundation Blender
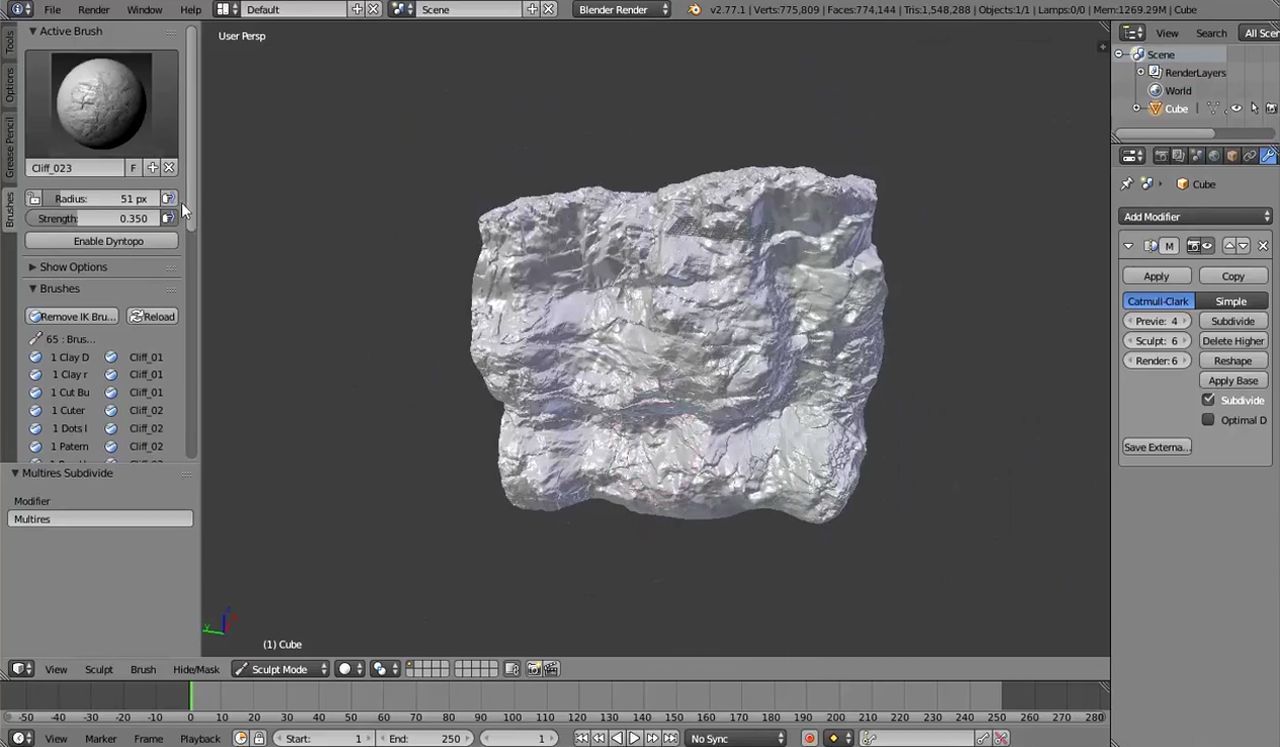
Blender has a surprisingly comprehensive sculpting tool-set: dyntopo (similar to 3D Coat's Live clay tools), multi-resolution sculpting (save for sculpting layers support), can sculpt on thin meshes and even has a ZBrush mask extract alternative tool!
The issues for me are:
- Some of these tools are still in development, some are developed by the community. It's a big patchwork quilt.
- Working in muilti-res mode can corrupt your meshes from time to time (according to Reddit discussions) and you will not find out about the fact until you switch back to the lowest subdiv and try sculpting on it.
- Blender doesn't have ZRemesher-level auto-retopology tools out of the box. Again, maybe addons. Look for them, try to make them work in the current Blender branch... Very exciting. Except not for me.
Call me lazy and biased, but as much as I liked tinkering with software, I decided to let Blender pass. I just don't know what it is exactly, but every time I even begin to think about investing time into Blender, it is as if my brain is screaming "No!". Even the fact that Blender is free doesn't help for some reason. Well, what did you expect from an inexperienced amateur looking for off-the-shelf software solutions? Feel free to judge and ridicule me as you like.

If you are seriously looking into sculpting in Blender do watch this new video from Blender Conference 2017 where Zacharias Reinhardt shares his tips and tricks on sculpting in Blender. The guy actually gives some useful non-software-centric sculpting advices so I would recommend anyone interested in digital sculpting to watch the video.
The Foundry Modo
Modo supports multi-resolution sculpting and sculpting tools can also be used on non-multires meshes, which is nice. It also supports masking, stencils and stamps.
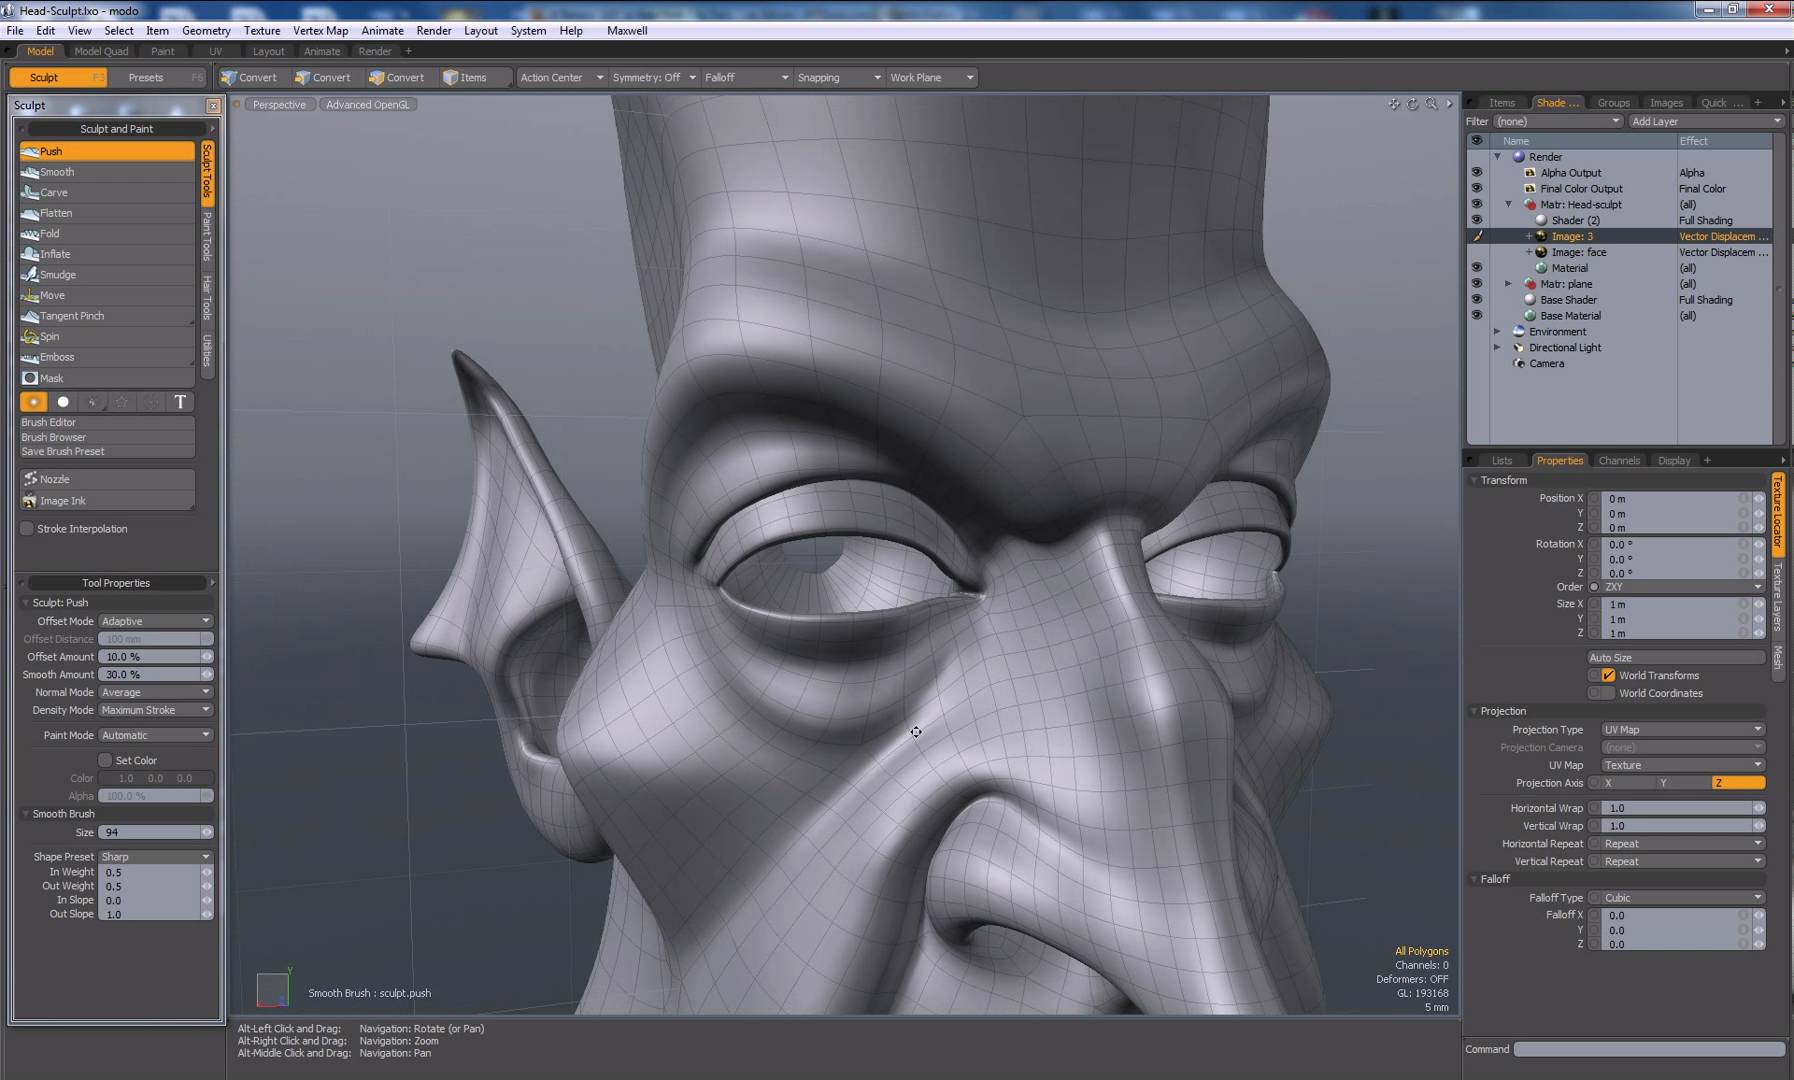
Pretty neat, but it also costs $1800 for a permanent license and $600 with an annual subscription. That's the reason I didn't even even try it out and just watched a couple of demo videos and speed sculpts to check out what it was capable of. If you're working in Modo you're probably already happy with the sculpting tool-set if provides, so I won't delve any further.
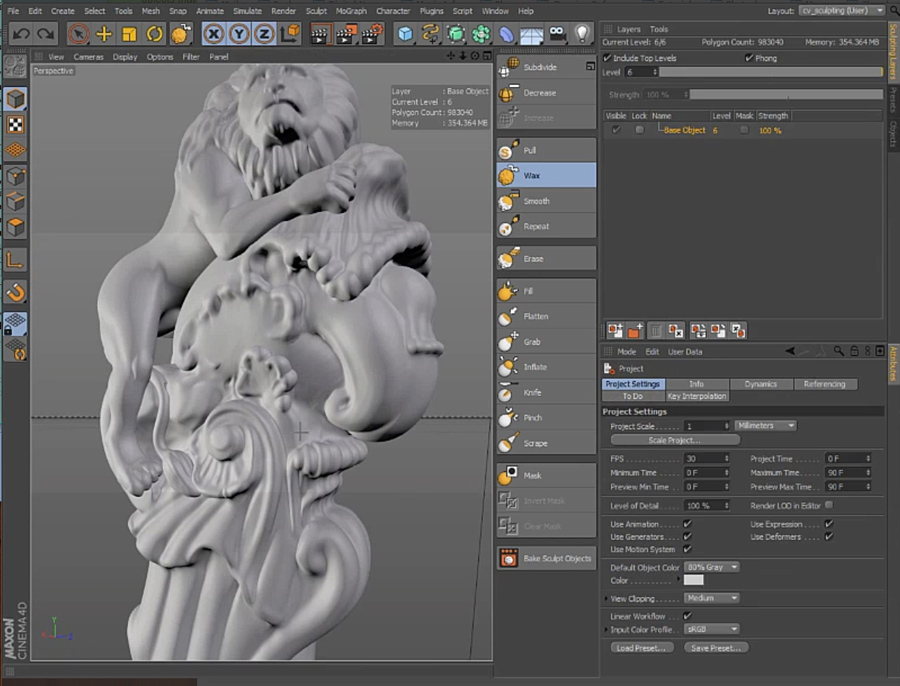
Maxon Bodypaint 3D (Cinema 4D)
Bodypaint is a special edition of Cinema 4D Prime, and Cinema 4D has long been my favorite and a potential "escape route" since the day Softimage officially went EOL: it's sleek, modern, feature-rich and still available for perpetual licensing. So I decided to give a trial of Maxon Bodypaint 3D a chance and quite liked it! Bodypaint 3D has everything the cheapest edition of C4D provides plus sculpting and texturing tool-set, including sculpting layers.
It costs about EUR 800, but the license is perpetual. Since it's the year 2017, the version available for purchase is BP3D version R19, which means it has lots of goodies like viewport depth of field, screen-space reflections and (finally!) vertex painting tool-set. And since it is Cinema 4D it will play nice with Adobe After Effects! C4D Lite bundled with AE CC is seriously lacking, especially in the rendering department, and DP3D being an enhanced C4D Prime is a perfect tool to increase productivity in After Effects! Also since I'm still a happy After Effects CS6 user, I don't even have access to C4D Lite, so in my case it's either BP3D or nothing.
You see, not many people remember that there was an C4D export plug-in for After Effects CS4 to CS6 which ultimately grew into the Cineware add-on available in AE CC.
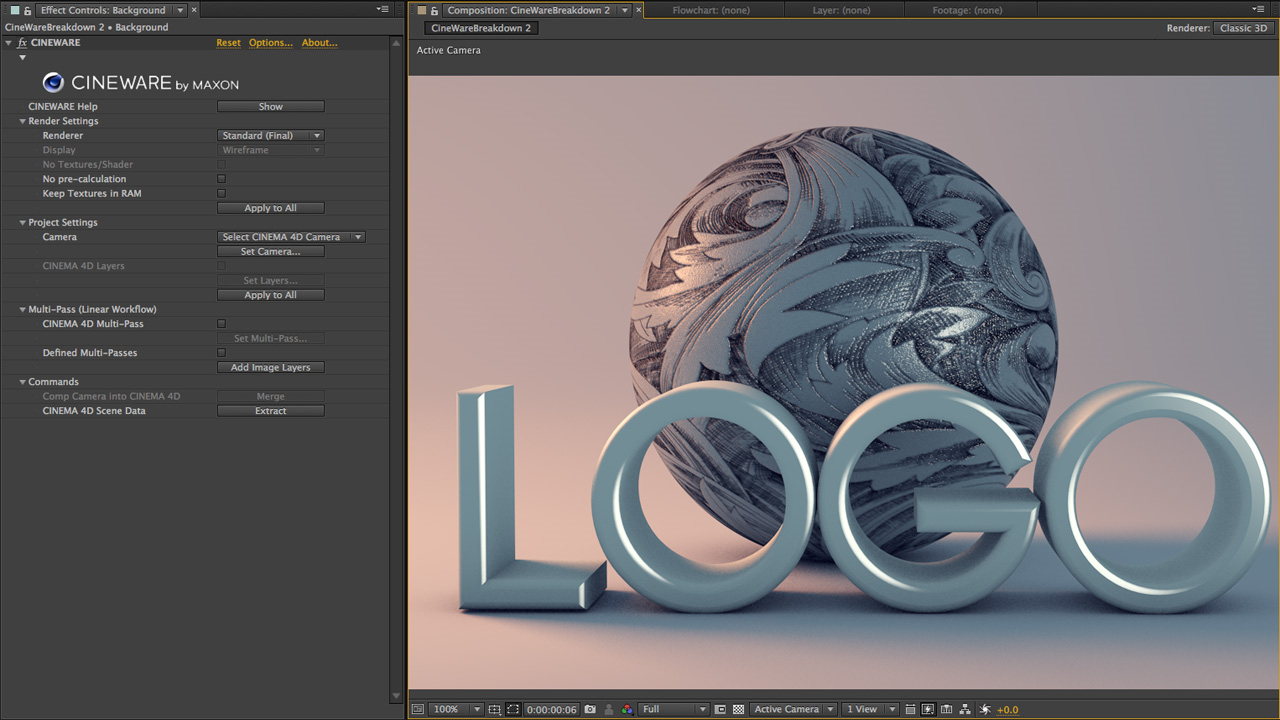 After Effects Cineware plugin
So, for example, thanks to After Effects CS6 having a pretty reliable camera tracker, I wouldn't need to purchase additional software like Syntheyes or even use the Autodesk Matchmover which I received with my copy of Softimage. I can track the footage in After Effects and easily export a 3D scene with a tracked camera to bring it into any edition of Cinema 4D in one click. Huzzah!
Still, as a sculpting tool the software is far from not perfect. It is unfortunately pretty much limited to 5-7 mil poly count in the viewport and tends to corrupt meshes when going this far. It's very RAM-hungry and can easily take over 10+ gigs of ram even with such more or less modest polygon counts.
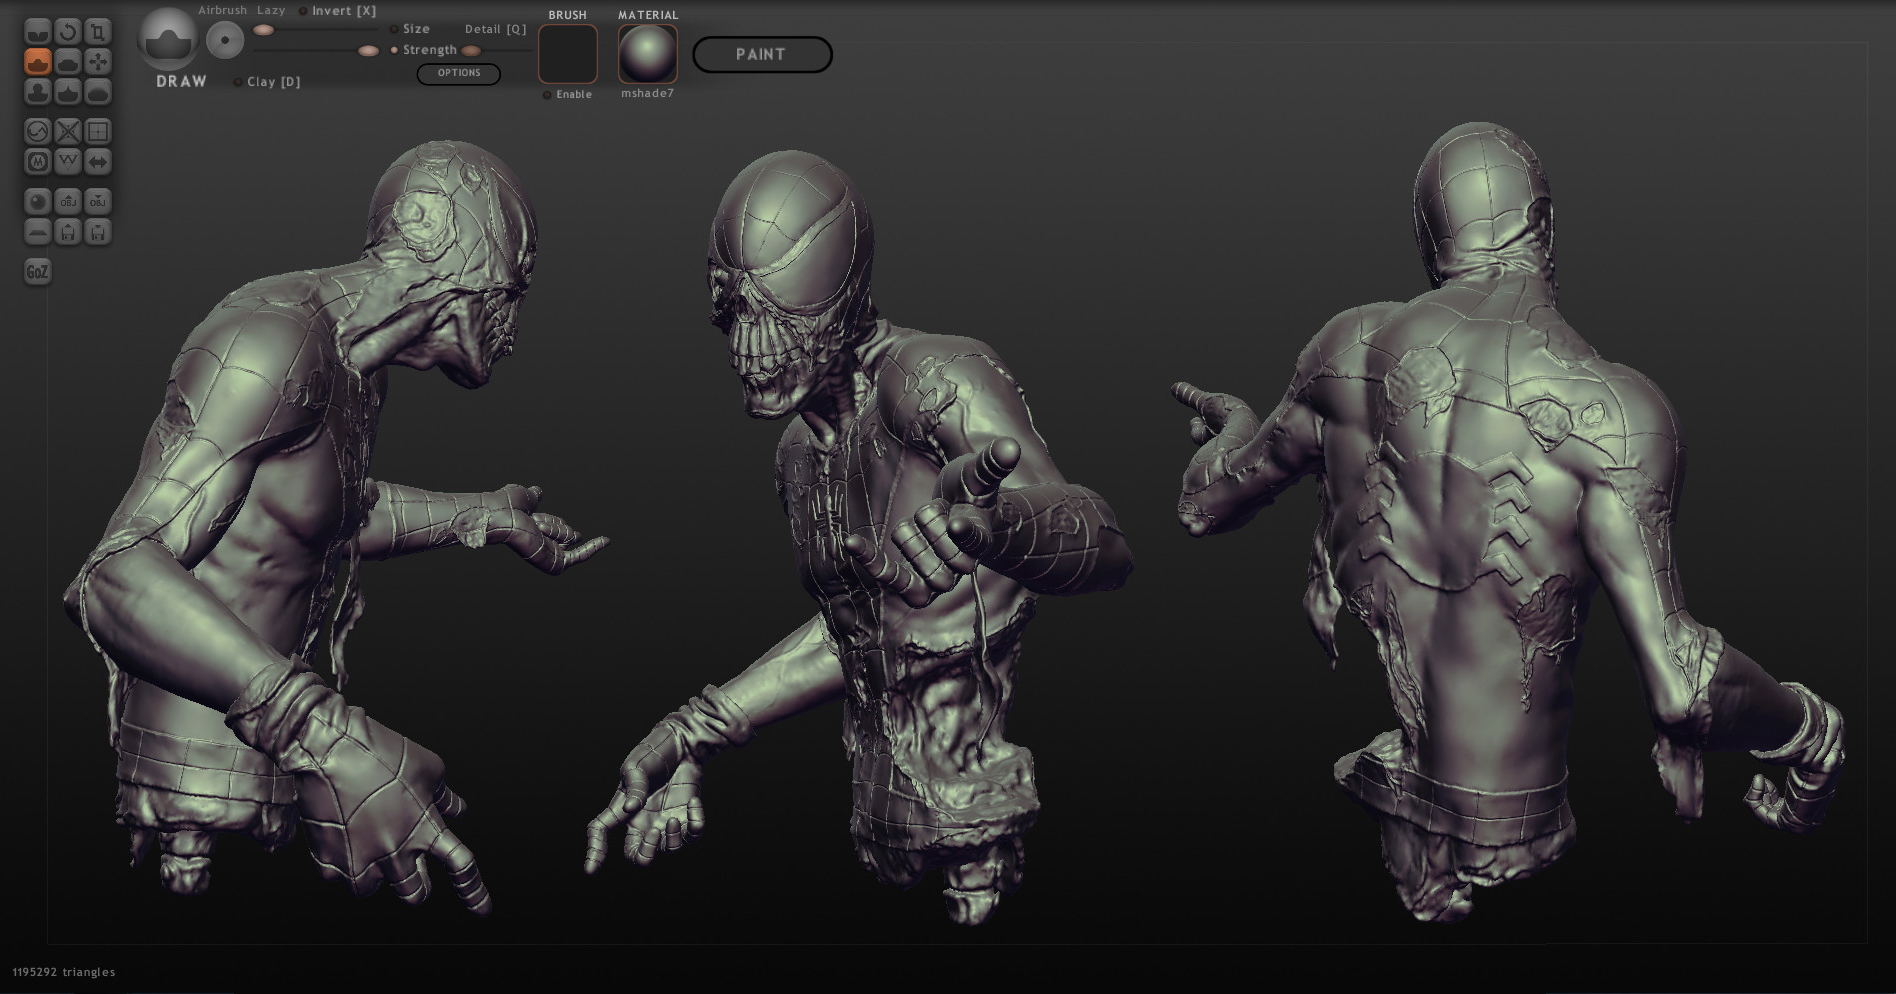
Just for the fun of it, here's what I was able to sculpt in a trial version of BP3D in a couple hours:
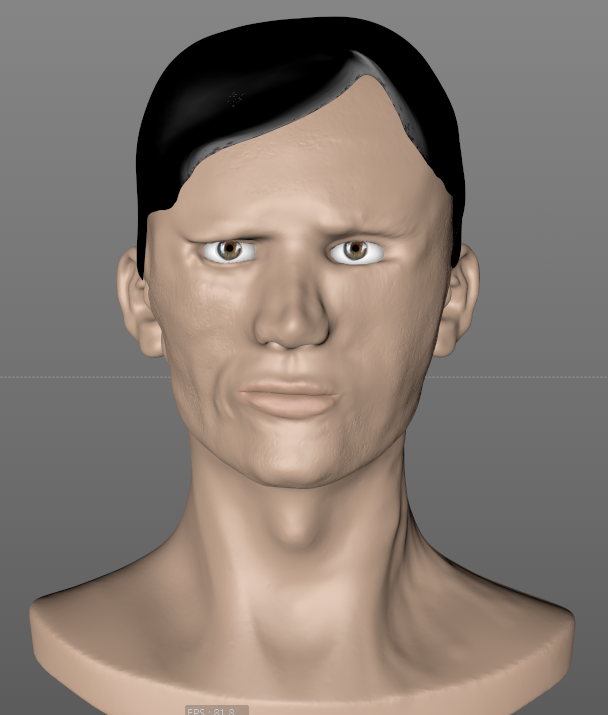
I shall call you The KGB Radioman!
This in fact my first CG sculpt that actually looks like something, even though it is clearly terrible =)
Autodesk Mudbox
Mudbox is an interesting beast. As I mentioned in one of my tweets, if you have trouble navigating in ZBrush and would like to sculpt in a piece of software with an "old-school'ey" interface and traditional Maya-like ALT-style navigation, I would recommend you to try Mudbox.
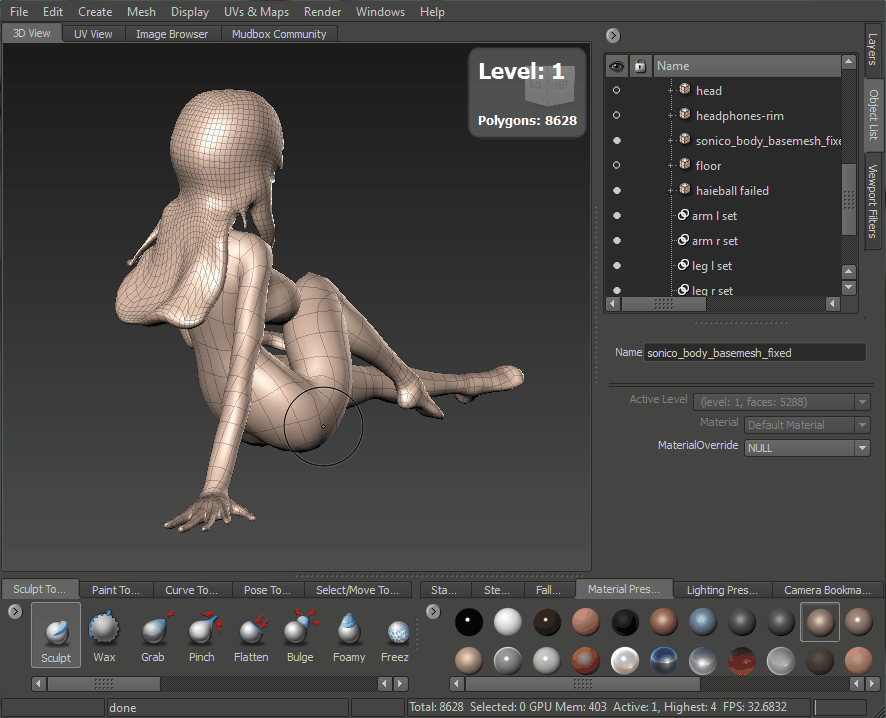
Nowadays, unfortunately, compared to most sculpting suites out there, Mudbox falls seriously short.
Pros:
- Mudbox subscription is surprisingly cheap! 1 year sub will set you back for only 80 bucks! I suppose such generous pricing is probably due to the fact that Mudbox sculpting tools are being ported to Maya. I've been reading the forums and indeed according to Autodesk, they are focusing more and more on Maya. So Mudbox isn't EOL per se, but it's not receiving much love. Well, good news for us, customers, because it's now dirt cheap.
- Mudbox is stable like you wouldn't believe. Almost makes you wonder if it really is an Autodesk app! Oh wait, it's not. Autodesk acquired it in 2007 and slowed down its development to a crawl over the years. At least they didn't make it worse, I guess.
- Sculpting and Paint layers. Very useful, usable and reliable.
- It's ridiculously fast with dense meshes if you have a descent graphics card (I was able to effortlessly sculpt on a 25-mil polygon mesh without lags with my GTX1070!)
- Auto-retopologizer tool makes it possible to start modeling with a primitive and end up with an object as detailed as a human head, for example. Proof.
- It provides quick mesh caching when jumping between mesh levels.
- Mudbox has a "Send to" command to quickly send meshes to other Autodesk suite software modeling packages to modify the topology (you will still need to re-project sculpted detalis from the original mesh, though)
- Overall smooth experience, a pleasure to sculpt and navigate in the viewport.
- Has topology-selection tools, so you can select and mask parts of the mesh based on topology, like fingers, for example.
- You can create and store "selection sets". Kind of an alternative to ZBrush polygroups for quick masking.
- Supports PTEX texture mapping system and is quite fun and responsive to use in Paint mode if you decide to make PTEX a part of your workflow.
Cons:
- It hasn't been updated for a while. When I say "updated" I mean addition of some seriously meaningful features and not just bug fixes.
- It has zero mesh change tools apart from the "close hole" operation which fill holes with triangles. So no alternatives to ZBrush DynaMesh, Blender dyntopo and 3D Coat Live clay tools.
- Auto-retopologizer is quite slow, although does in most cases produce meshes with acceptable polygon flow. Still it simply can't hold the candle to the amazing ZBrush ZRemesher.
- No radial symmetry. Minor issue? Maybe. Until you need it, that is.
- No PBR workflow and viewport, Mudbox still uses CGFX materials. Welcome to the year 2017! This is unacceptable for an app which is also positioned as painting software.
- Doesn't play nice with thin geometry. No lighting on polygon back faces and every brush stroke will only respect facing polygon normals.
All in all, sculpting in Mudbox was fun while it lasted. I was originally planning to complete the 3D Figure sculpt in Mudbox, so I paid for a year of subscription and got to work on the project and got to work...
Here is where it gets interesting.
Pixologic Sculptris
Of all digital sculpting programs available, Scupltris is recommended for beginners for its powerful yet relatively intuitive user interface. Sculptris was initially developed by Tomas Petterson as a hobby project in early 2009. Somewhere down the line Pixologic purchased Sculptris and implemented the dynamic tessellation feature into Zbrush now known as "Dynamesh".
It's as simple as a standalone sculpting app can be, yet allows for complete freedom and almost carefree creative process. It's also free so nothing should stop you from picking it up and starting sculpting right away.
As to be expected, Sculptris is as limited as it is easy to use: forced triangulation, no multi-resolution sculpting, let alone advanced features like layers and other such things.
Try to think of Sculptris as a "free trial" for Zbrush. Navigation is the same, the sculpting feels pretty close to that of ZBrush, but the sculpting tools are kept to a bare minimum.
Needless to say, Sculptris is a great free virtual clay playground which I will not be using in my projects =)
Pixologic ZBrush
Ah, ZBrush...
As most of 3D folk of the day, when I first laid my eyes upon ZBrush I was... Stunned. It was as if the aliens from Cassiopeia gathered together and conjured a piece of software as distant from traditional CG concepts as (in)humanly possible. It was different in everything: the interface, the workflow and even the fact that ZBrush was (and still is) CPU-bound and didn't utilize your GPU for anything apart from outputting the CPU-rendered canvas to the monitor.
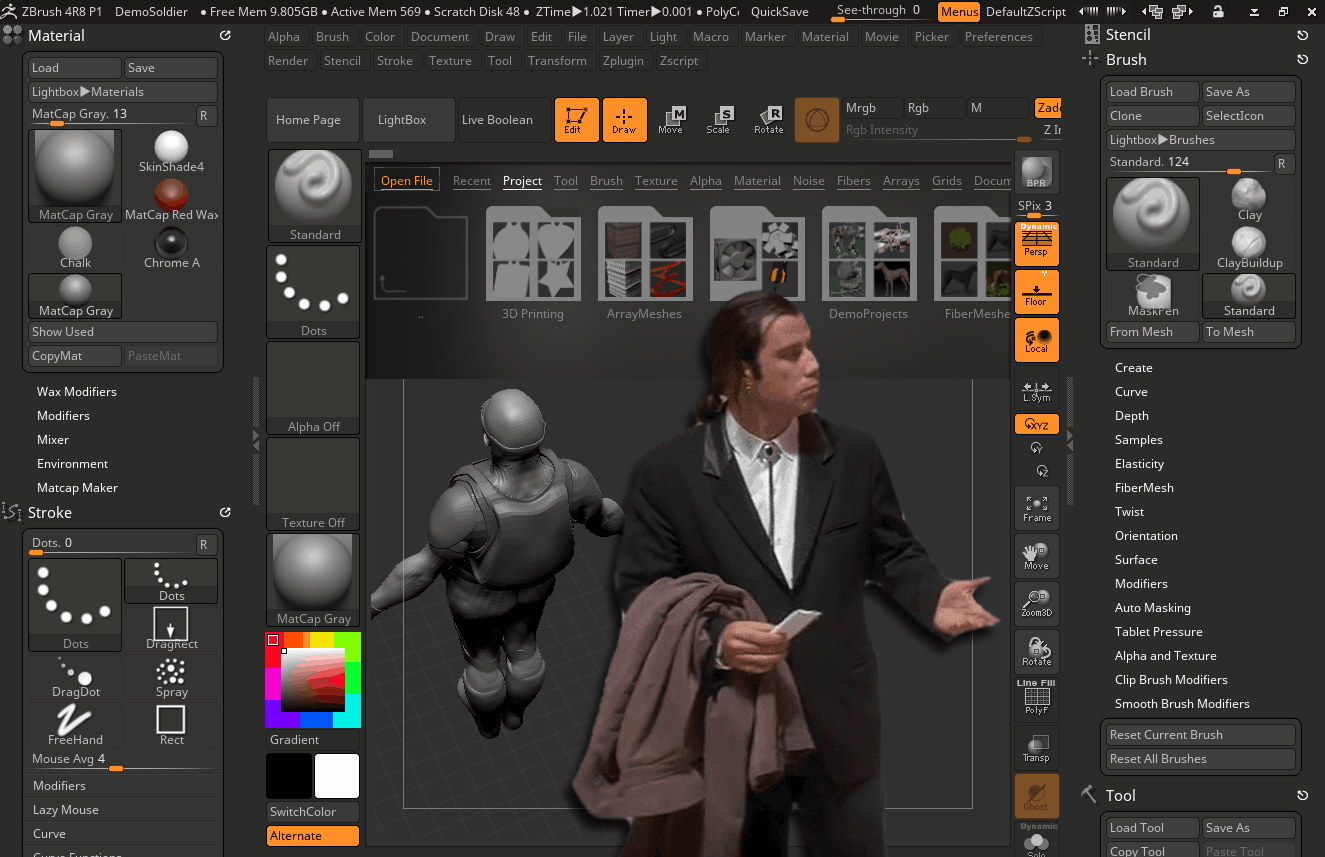 ZBrush interface can seem daunting and overcomplicated at first
As if it weren't enough, ZBrush also presented its own way of navigating in the viewport, the so-called "right-click navigation" with a very peculiar way of switching between panning and dollying for example. It was so peculiar and special in fact, that my first several sessions in ZBrush ended in utter failure to produce anything reasonable because of not being able to effectively navigate!
So just as I explained in my previous post, I tried out ZSwitcher, but soon realized that it was a bad idea, since it changed too many default hotkeys and would forever bind me to this plug-in (which was not free) if I were to keep using it.
This time, however, while working my way through Mudbox I decided to give ZBrush another try just out of curiosity and remembering that ZBrush offered some great tools I might need even without actually having to use it to sculpt my meshes...
And this time it clicked.
What I mean is, you need discipline to adapt ZBrush navigation. Small steps, mindful practice, but soon enough it will become... Well, if not second nature, but at least not something to break out in a cold sweat every time you launch the software. That's why in a couple of weeks I finally became a ZBrush user and finally dropped Mudbox. The actual story of how that happened is something I'll reveal in my next post. But in this one I would like to present the most important features of ZBrush which made me switch and never look back (as well as not look for another sculpting app for as long as ZBrush is alive).
Still, if you're expecting an elaborate ZBrush review... Don't. You won't find one anywhere. Or at least I couldn't.
The best way to get a taste of ZBrush is to whether play with the Trial version and/or watch some good beginner tutorials on the web. The learning curve is steep and the it takes time to fully grasp what ZBrush workflow is all about. But as soon as you do (and if you really are into digital 3D sketching and sculpting), the pros totally outweigh the cons and you end up with a powerful tool to realize most if not all of your creative potential, as well as have the skills to utilize this powerful tool.
The Brushes
ZBrush offers so many "brushes" it will make your head spin. Brushes come in the form of classic geometry modifiers like Standard or ClayBuildup, as well as Curve brushes which can generate elaborate curves and chains, MeshInsert brushes which can insert meshes into your sculpts, and even such special ones like Topology brush which offers an intuitive way of creating manual topology over existing sculpts by drawing intersecting curves, as well as brushes for manipulating the so called "Fibermesh" – hair-like geometry generators in ZBrush.
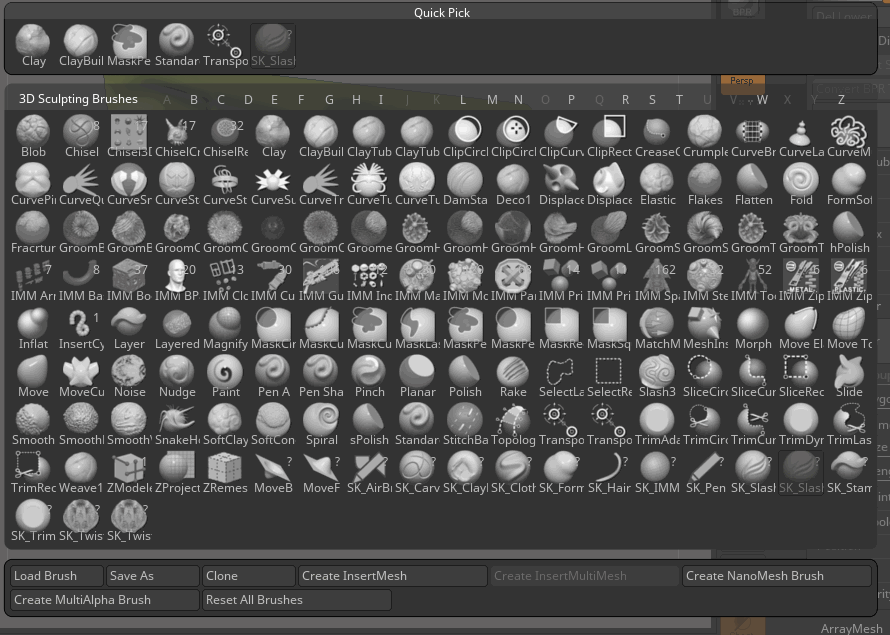 ZBrush offers a plethora of tools and brushes
I believe as of v4R8 ZBrush offers each and every basic brush type you will ever need to sculpt your meshes or use to create versions of your own brushes.
Thin Geometry Support
Consider this a pet peeve of mine, but I believe unless a 3D DCC is capable to work with both sides of thin geometry, it cannot be called an accomplished sculpting software.
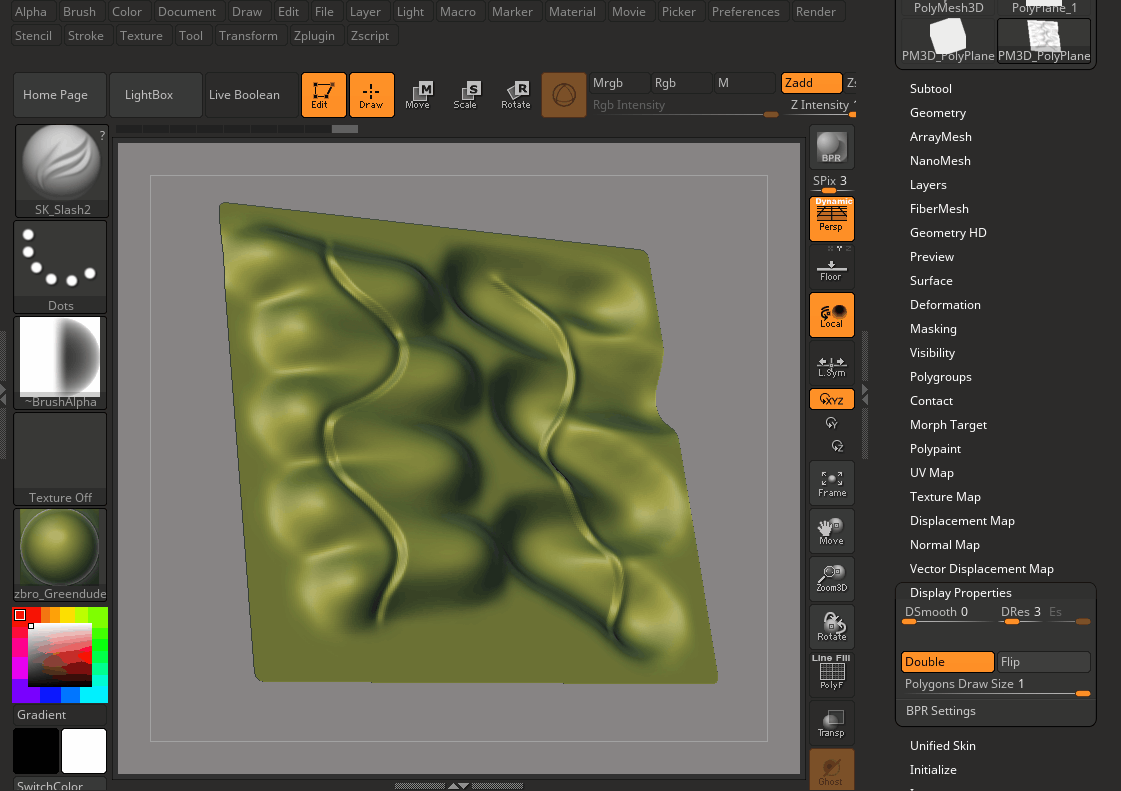 Full thin geometry support in ZBrush
Just as a reminder: of all the 3D DCCs I looked into, only ZBrush and Blender were able to effortlessly work with thin meshes. Others struggled to find normals on flipped polygons or even be able to light them properly. It is a big deal when you're creating thin objects like clothing without having to apply thickness right away and be constantly conscious of what you're doing to both sides of the thick mesh.
Dynamesh
Dynamesh is a neat feature of ZBrush which allows you to remesh any sculpt into a new mesh with a specified resolution.
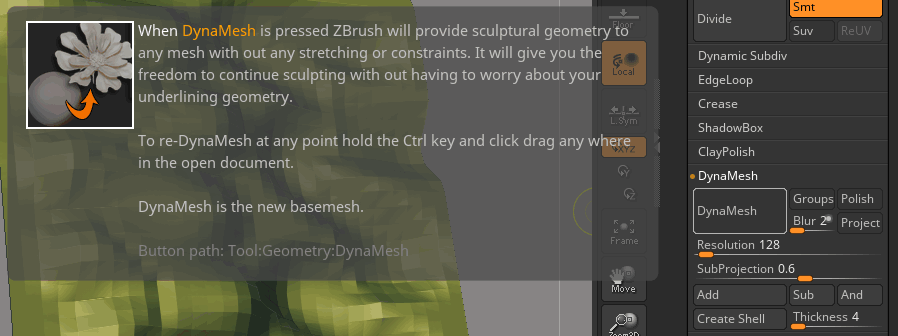 DynaMesh is a great way to toss topology-related limitations aside and get creative right away
The cool thing is that after remeshing no matter how many parts the mesh was comprised of, all of those will be fused together into one (or several, depending on the form) watertight mesh, so Dynamesh is especially useful when you're just starting a new concept mesh from scratch, like, for example, turning a sphere into a detailed human head as well as when you're done with your final sculpt and are preparing it for 3D printing since a valid 3D-print mesh must be watertight and usually consist of one large polygon island.
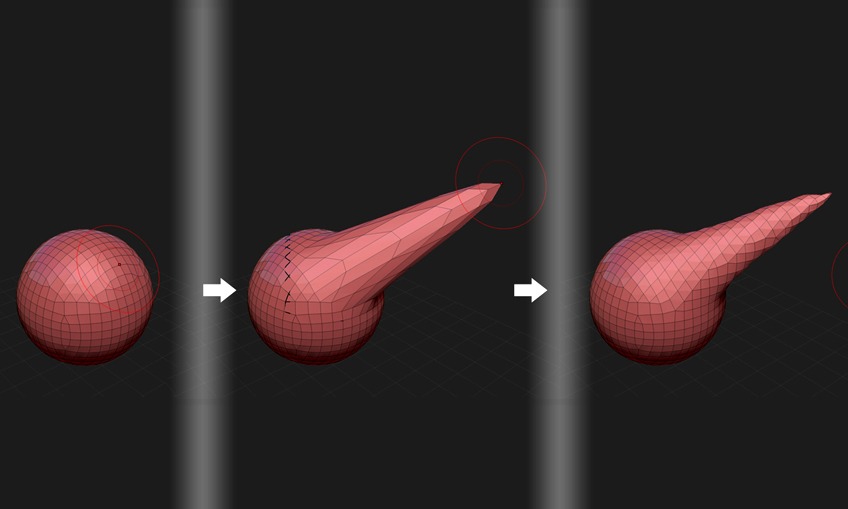 Dynamesh used to remesh a stretched polygon sphere into a new mesh with even topology
It's difficult to explain what Dynamesh does in a couple of sentences, so here's a comprehensive demonstration of what it is and how it should be used within ZBrush:
Just as a final note I will mention that Dynamesh can be used to add specified thickness to your sculpts to aid in 3D printing thanks to it's "Create Shell" function. Saving time on printing and money on filament or resin. Ain't that cool?
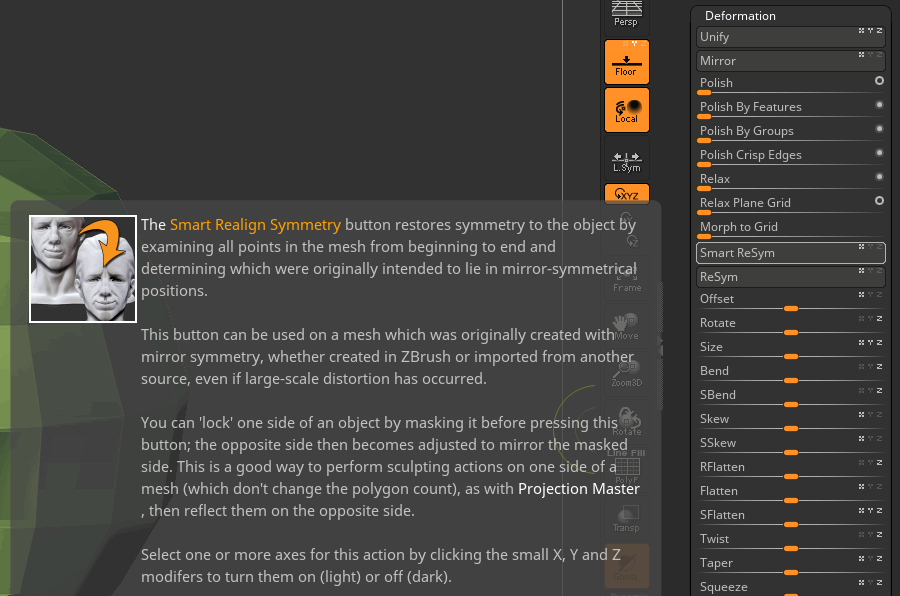
Deformation Tools and Smart Resym
I won't spend too much time explaining why exactly I find the Deformation Tool-set amazing, especially the Smart ReSym tool. When the time comes for you to use one of the polish modifiers, you will find out what it is that makes ZBrush even more powerful than anything out there on the 3D sculpting app market.
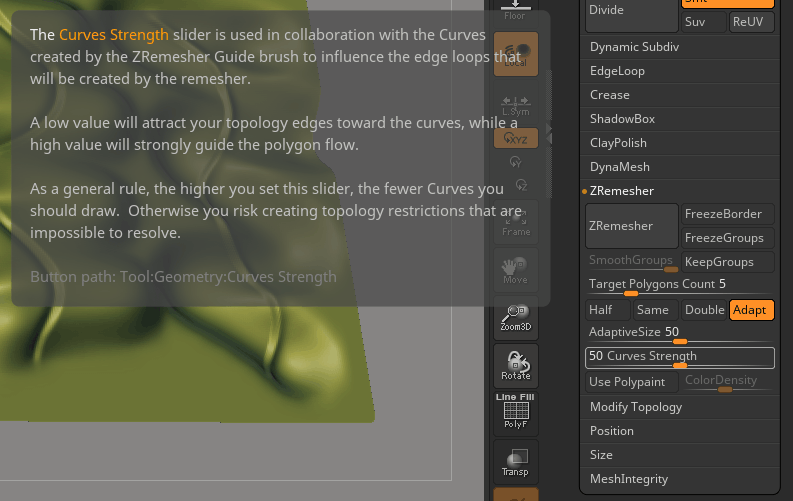
ZRemesher And Topology Brush
ZRemesher was the singular reason I returned to ZBrush at all. It is such an amazing automatic/semi-automatic retopology tool. Unless you knew what it was capable of, you wouldn't believe that it could slash time you spent on manual retopology by 70-80%, simply due to the fact that it could produce quad meshes with excellent polygon flow basically in a couple of clicks.
Don't believe me? Watch this:
Masking And Polygroups
Efficient workflow is important to keep you "in the zone" when you're in the process of creating something. ZBrush offers two great abilities to aid you in that: powerful masking brushes and "polygroups".
 ZBrush masking. Literally!
What masking can be good for you can probably guess, but polygroups allow you to group your meshes' polygons into several colored islands which you can then use to quickly hide/un-hide parts of your mesh as well as turn them into guides for such operations as adding polygon loops, dynameshing, zremeshing, deleting parts of the mesh and polishing.
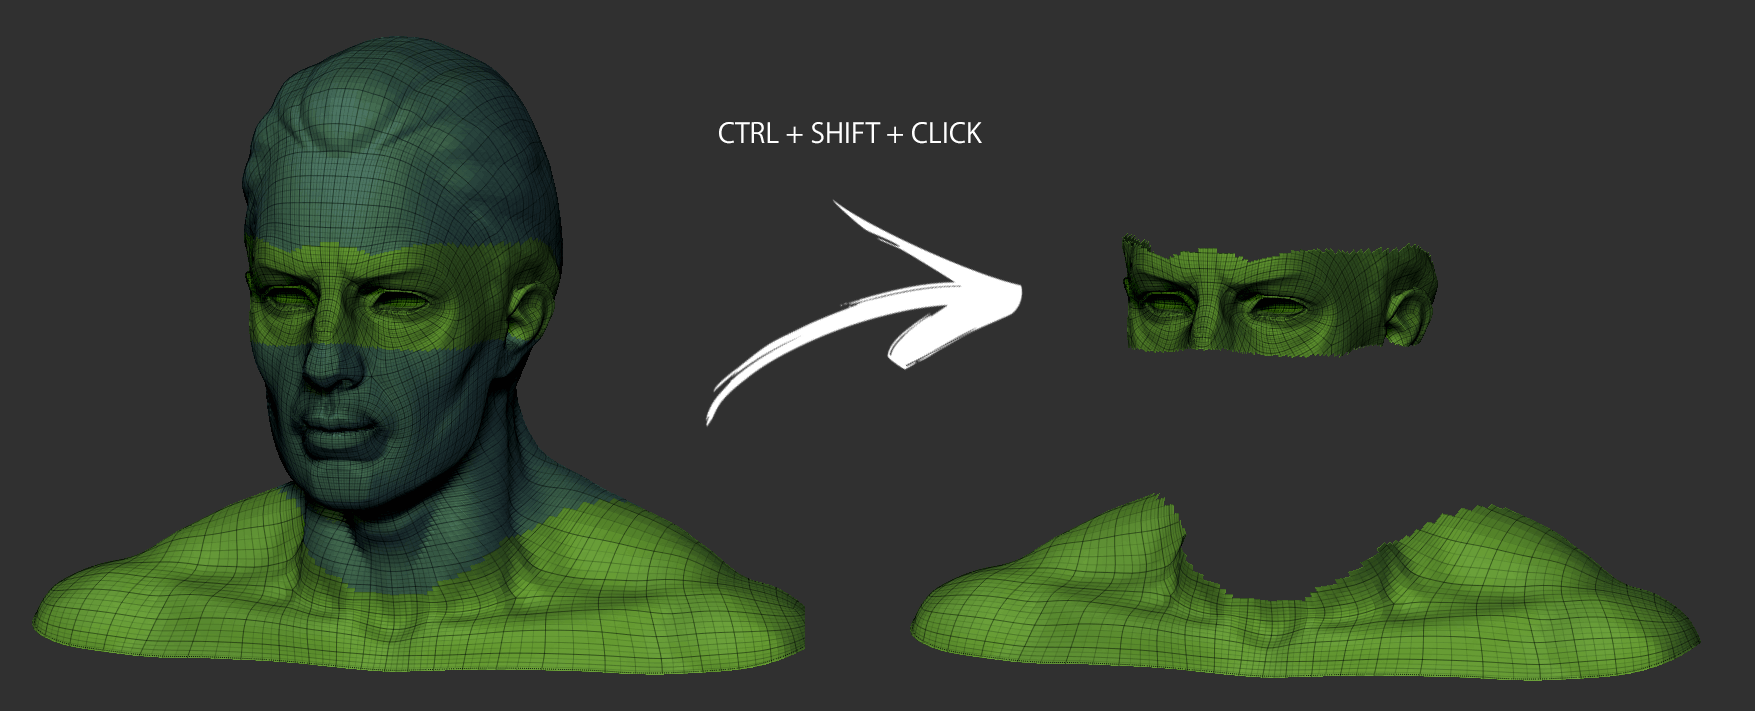 Hide parts of the mesh with one click using polygroups
Final words
Lots of people find ZBrush interface daunting and overcomplicated. To tell you the truth, I don't consider it to be that bad. I do believe, though, that the default layout is not very efficient and only good for familiarizing yourself with the software before building up your own configuration of the UI (and hotkeys!) for actual production.
What I'm trying to say with this long blog post is this: having tried ZBrush and its ZRemesher once in 2014 I was instantly hooked. And since ZBrushCore edition of ZBrush didn't have it, there was only one way...
I wasn't ready to purchase a license for a full-fledged version of ZBrush back then due to basically not being able to use it at all, save for ZRemeshing, but this October I finally bit the bullet and jumped ship. I am now a happy Pixologic customer and will spend the next months learning everything ZBrush can provide, hoping to ultimately use it to produce my animated film.
Oh, right, almost forgot!
Stay tuned for the next post, where I will explain the process of going from a basemesh to a final Super Sonico figure sculpt!